

WhatsApp has become an operational messaging channel for alerts, confirmations, and real-time notifications.
This guide shows how to implement a Contact Form 7 to Twilio WhatsApp integration using a direct API approach. Instead of relying on plugin-level WhatsApp connectors or unofficial endpoints, this setup sends CF7 submissions to the Twilio WhatsApp Business API using authenticated requests, structured JSON payloads, and full request visibility via Contact Form 7 to Any API PRO.
Nothing is abstracted. Headers, credentials, payloads, and logs remain fully visible and production-safe.
Reference Implementation (Video Walkthrough)
If you prefer a visual walkthrough, this video demonstrates the same CF7 to Twilio WhatsApp API configuration shown below, step by step.
Step-by-Step: CF7 to Twilio WhatsApp API Integration
Step 1: Create a Twilio Account
Visit Twilio and sign up for an account. Complete email and phone verification to access the Twilio Console.
Step 2: Get Your Twilio Credentials
Inside the Twilio Console, navigate to Messaging to locate your credentials.
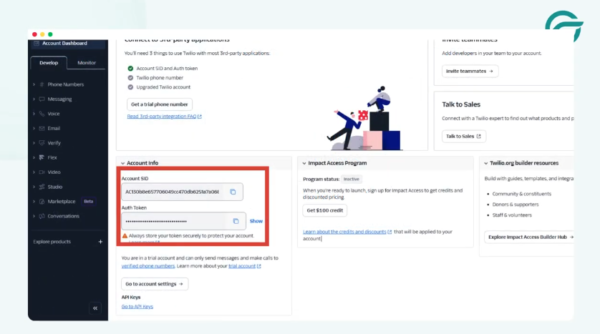
You will need:
- Account SID
- Auth Token
Twilio Identity and credential details are documented here. These credentials are required to authenticate all API requests.
Step 3: Log in to WordPress and Create a New Integration
> Log in to your WordPress admin panel.
> Go to CF7 to Any API → Add New Integration.
> Give your integration a clear internal title (for example, CF7 → Twilio WhatsApp).
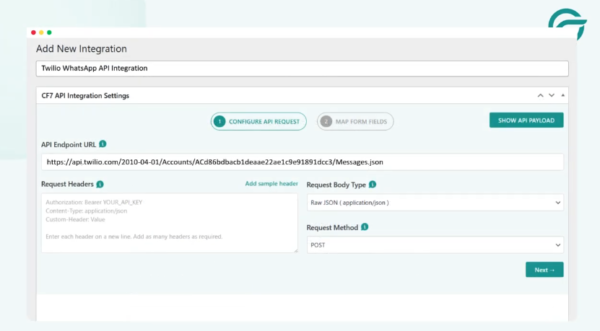
Step 4: Configure the API Endpoint URL
For the API endpoint, refer to Twilio’s Messaging API documentation.
Copy the required endpoint format from Twilio’s docs and paste it into the API Endpoint URL field.
A typical endpoint looks like:
https://api.twilio.com/2010-04-01/Accounts/{ACCOUNT_SID}/Messages.json
Step 5: Set the API Key
Use your Account SID as the API Key.
Paste it into the API Key field.
Step 6: Set the API Secret Key
Go back to Twilio’s documentation and locate the Auth Token used for sending messages.
Paste this value into the API Secret Key field.
For testing environments, Twilio also provides test credentials.
Step 7: Configure Request Headers (Basic Authentication)
Twilio uses HTTP Basic Authentication. To understand the authentication model, refer to Twilio’s glossary.
You will need to send an Authorization header using Base64-encoded credentials.
Step 8: Generate Base64-Encoded Credentials
Combine your credentials in this format:
ACCOUNT_SID:AUTH_TOKEN
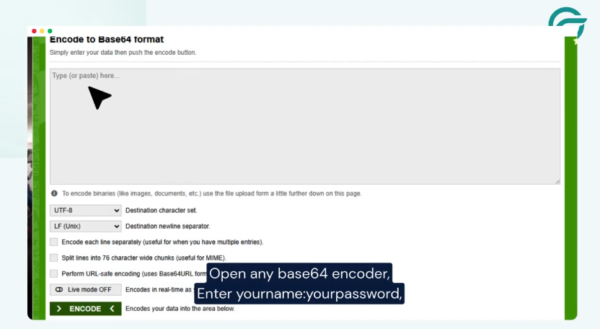
> Open a Base64 encoder.
> Paste the combined value and copy the encoded output.
> Use this output in the Authorization header:
Authorization: Basic {base64_encoded_value}
> Paste this into the Request Headers field in CF7 to Any API.
Step 9: Select the Contact Form
Choose the Contact Form 7 form you want to trigger the WhatsApp message.
In this example, the WhatsApp (138) form is selected.
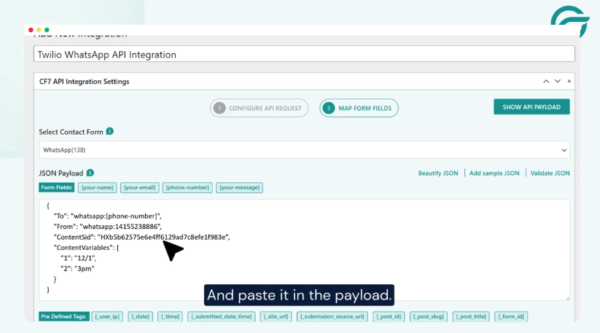
Step 10: Configure the JSON Payload
Add the destination WhatsApp number to the JSON payload.
Ensure the payload structure matches Twilio’s Messages API requirements.
Step 11: Add the ContentSid (Template ID)
WhatsApp messages sent via Twilio must use approved message templates.

- Go to the Twilio Dashboard.
- Open Content Template Builder.
- Create a new template.
- Copy the Template SID (ContentSid).
- Paste it into the JSON payload.
Free-form outbound WhatsApp messages are not supported for business messaging.
Step 12: Schedule and Save
Set the date and time for sending messages.
Save the connection.
Step 13: Verify in API Logs
Once the form is submitted, navigate to:
CF7 to Any API → Logs
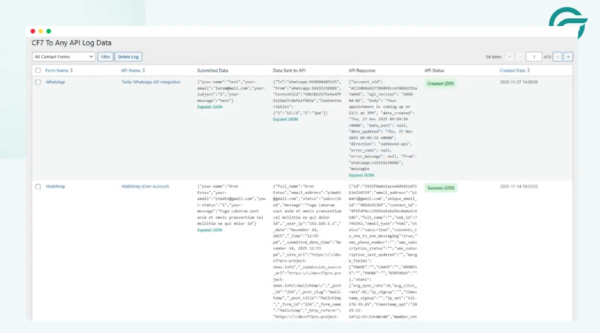
You should see:
- Full request payload
- Request headers
- API endpoint URL
- Twilio’s response (success or failure)
This confirms the integration is working correctly.
Why an API-First WhatsApp Integration Scales Better
This setup is designed for developers who need deterministic, observable behavior in production systems.
- Explicit control over authentication headers
- Fully structured JSON payloads
- Complete request and response logging
- No dependency on unofficial WhatsApp endpoints
- Compatible with internal APIs, proxies, and audit workflows
There is no middleware layer making assumptions on your behalf.
Smart Summary
A Contact Form 7 submission triggers an event. Contact Form 7 to Any API converts it into an authenticated HTTP request. Twilio processes the request and returns a response.
Logs capture both success and failure.
Nothing is hidden. Everything is visible.
Availability
This integration is supported only via Contact Form 7 to Any API PRO.
It is required when:
- CF7 data passes through internal or proxy APIs
- Structured payloads must be stored or routed server-side
- Auditing, compliance, or validation workflows are involved
