


Here is something surprising: More than 50% of website leads never make it into an email marketing system merely because form data is left sitting in inboxes. It is a staggering figure that highlights substantial opportunities are lost before businesses even begin their nurturing journey.
If you are using Contact Form 7 on WordPress and still struggling with manual transfers or incomplete data capture, you might be facing the same challenge.
So, how do you ensure every submission on your website instantly becomes a valuable contact in Klaviyo? The answer lies in seamlessly integrating CF7 with Klaviyo.
By learning how to connect Contact Form 7 to Klaviyo WordPress workflows, you gain more than convenience. You also obtain accuracy, automation, and the ability to personalize experiences at scale.
This WordPress Contact Form to Klaviyo integration guide will help you not only set up the connection but also understand the strategies that transform basic submissions into meaningful interactions.
Let’s uncover the insights that go beyond the ordinary and show you how integration can actually change the way you grow.
Why Integrate Contact Form 7 With Klaviyo For WordPress
Relying on manual data transfers from Contact Form 7 into Klaviyo is not only time-consuming. However, it also leaves room for costly mistakes. Missed submissions, misplaced details, and delayed follow-ups can quickly damage trust and make your email marketing less effective. Businesses that depend on consistent engagement cannot afford these gaps.
When Contact Form 7 and Klaviyo work in harmony, every form entry flows directly into your marketing engine. This automation reduces manual effort, improves accuracy, and ensures no lead is ignored.
Most importantly, it creates the foundation for advanced personalization, giving your campaigns the necessary precision to stand out.
Here is where integration makes a difference:
- Saves Time: No more manual export and import of leads.
- Prevents Errors: Accurate data sync keeps records organized and reliable.
- Improves Personalization: Tailor campaigns based on real-time form data.
- Supports Multiple Industries: Flexible enough for e-commerce, memberships, courses, and NGOs.
➡️For example, e-commerce stores can automate abandoned cart recovery and post-purchase flows. Membership websites can keep subscribers informed with timely renewal or welcome emails. Online courses can streamline progress updates, while NGOs can instantly send heartfelt acknowledgments after donations are received.
Core Insight: Connecting Contact Form 7 with Klaviyo in WordPress eliminates manual errors, saves valuable time, and enables personalized campaigns across e-commerce, memberships, education, and NGOs. It ensures every lead enters your marketing system immediately.
Benefits Of Contact Form 7 To Klaviyo Integration
Integrating Contact Form 7 with Klaviyo is more than a convenience; it is a strategic upgrade for your marketing system. Instead of treating form submissions as isolated entries, you can transform them into actionable data to drive engagement, build stronger relationships, and fuel long-term growth.
Here are the standout benefits of this integration:
- Streamlined Lead Capture and Segmentation: Every submission instantly lands in Klaviyo. It is organized into the right list or segment for targeted follow-ups.
- Enhanced Personalization: Map form fields such as name, email, and phone to create campaigns that feel relevant and tailored to each subscriber.
- Automated Workflows: Trigger welcome emails, nurture series, or product follow-ups the moment a form is completed, without delays.
- Higher Conversions: Quicker responses and relevant messaging help you connect with leads before their interest fades.
➡️For businesses, this means fewer lost opportunities and more meaningful interactions. A simple form entry becomes the foremost step in a customer journey that can lead to repeat purchases, ongoing memberships, or long-term support.
Main Message: Integrating Contact Form 7 with Klaviyo streamlines lead capture, boosts personalization, and powers automated workflows. It ensures every form submission becomes the starting point of a well-structured and conversion-focused customer journey.
Prerequisites For WordPress–Klaviyo Integration
Before diving into the setup, it is necessary to ensure you have the proper foundation in place. Skipping these essentials can lead to integration failures, missing data, or compliance issues later on. Think of this step as laying the groundwork for a seamless connection between Contact Form 7 and Klaviyo.
Here is what you need ready:
- WordPress with Contact Form 7 Installed: Ensure your website has the latest versions of both WordPress and CF7 for smooth compatibility.
- A Klaviyo Account with API Key Access: You will need to generate a Private API Key from your Klaviyo dashboard to authorize the integration.
- An Integration Plugin or Connector: Plugins such as Contact Form to Any API simplify the connection and give you sophisticated options for mapping and automation.
- GDPR and CCPA Considerations: Add consent checkboxes to your forms, configure unsubscribe workflows, and review your privacy policy for conformity with data protection requirements.
Preparing these fundamentals ensures you can connect without interruptions, keep your data safeguarded, and remain compliant with regulations from the start.
Smart Summary: Having WordPress with Contact Form 7, a Klaviyo account with an API key, a reliable plugin, and GDPR/CCPA compliance measures in place sets the groundwork for a seamless and secure integration.
Best Plugins For Contact Form 7 To Klaviyo Integration
Choosing the ideal plugin determines how smoothly your Contact Form 7 entries connect with Klaviyo. Though several options exist online, not all plugins are created equal in terms of reliability, features, and long-term support.
Here are the top plugins worth considering:
- Contact Form to Any API (Recommended): It is designed for flexibility and accuracy. It gives you total control over mapping, automation, and compliance. It supports advanced configurations such as sending leads to multiple endpoints, adding hidden fields, and handling custom requests.
Its yearly plan of $29.99 makes it affordable, dependable, and value-for-money for businesses that want future-proof integrations.
- Bit Integrations: A beginner-friendly tool that covers many integrations, including Klaviyo. Though it works well for simple use cases, next-level customization may be limited compared to specialized plugins.
- Advanced Form Integration: A versatile plugin that connects multiple apps, Klaviyo included. It is a practical choice for multi-platform users, but its interface may feel overwhelming if your only focus is on Contact Form 7 and Klaviyo.
➡️Pro Tip: Prioritize accuracy of data transfer, compliance features, ongoing support, and ease of updates when evaluating plugins. Contact Form to Any API consistently emerges as the superior choice for businesses that rely heavily on lead capture and automation.
Must-Know Insight: While several plugins can connect CF7 with Klaviyo, Contact Form to Any API offers the most reliable mix of advanced mapping, compliance support, and long-term flexibility, making it the ideal solution for serious marketers.
Step 1: Installing The Required Plugins
Now, we will walk you through the integration process. The first step in connecting Contact Form 7 with Klaviyo is to ensure both the form and the integration plugin are installed correctly on your WordPress website. Without these essentials, the rest of the process cannot begin.
Follow these steps to get started:
- Install Contact Form 7: From your WordPress dashboard, go to Plugins → Add New, search for Contact Form 7, and click “Install,” then “Activate.” This plugin will handle form creation and submission collection.
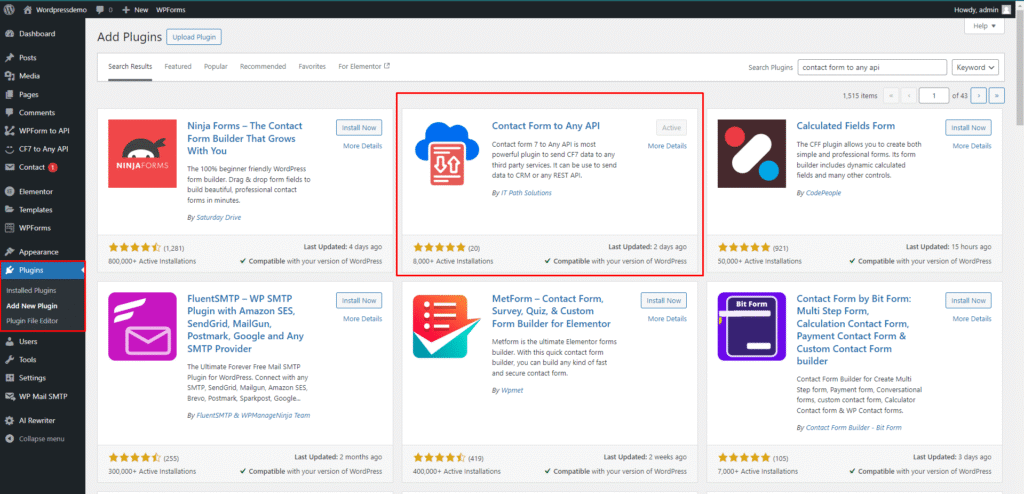
- Install the Integration Plugin: Next, add the plugin that connects your forms to Klaviyo. If you choose Contact Form to Any API, upload it through Plugins → Add New → Upload Plugin, then activate it. It will bridge Contact Form 7 with Klaviyo for real-time data transfer.
Once both plugins are active, you are all set to configure your form and set up the Klaviyo connection in the following step.
What This Means For You: Installing Contact Form 7 and a trusted integration plugin, such as Contact Form to Any API, ensures your WordPress website is ready for a seamless connection with Klaviyo. It lays the foundation for accurate and automated lead sync.
Step 2: Setting Up Contact Form 7 For Klaviyo
With the plugins installed, the next step is preparing your Contact Form 7 for smooth integration with Klaviyo. A well-structured form not only captures the warm data but also ensures compliance with privacy regulations.
Here is how you can set it up:
- Create a New Form: In your WordPress dashboard, go to Contact → Add New. Design a form with essential fields such as Name, Email, and Phone, depending on the data you want to send to Klaviyo.
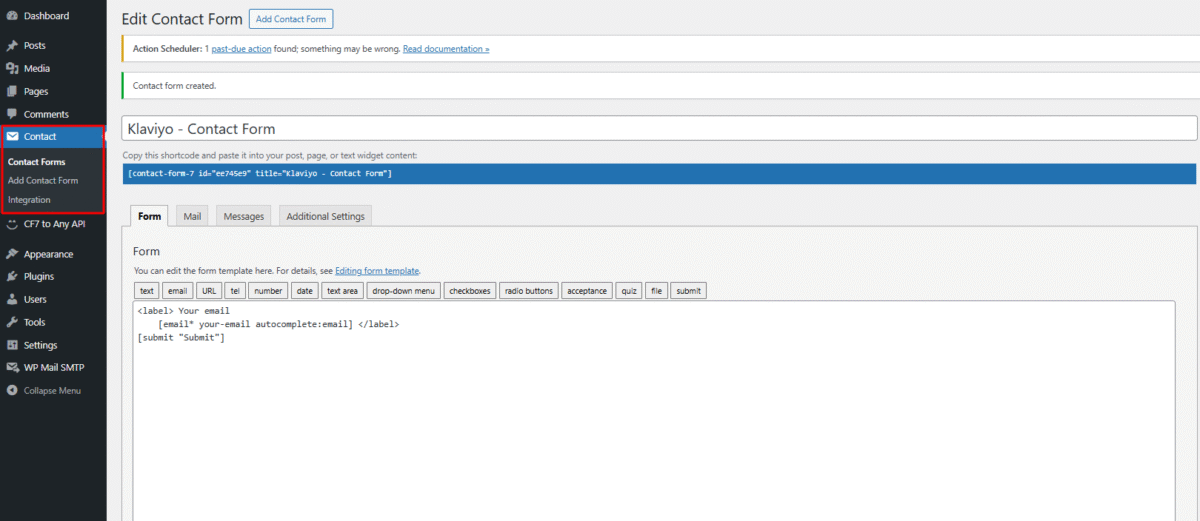
- Configure Field Settings: Keep field names clear and consistent. It will make mapping to Klaviyo fields much easier thereafter. For example, use “First Name” instead of generic labels.
- Add a Consent Checkbox: Include a checkbox that asks users to agree to receive communications. It ensures adherence to GDPR and CCPA. It also protects your business and reassures your subscribers.
- Enable double opt-in if required: Double opt-in adds an extra layer of confirmation by asking users to verify their email address before being added to your Klaviyo list.
By setting up your form with precision and compliance in mind, you reduce the chances of errors during integration. It fosters trust with your audience from the very first interaction.
Quick Recap: Preparing your Contact Form 7 with definite fields, a consent checkbox, and an optional double opt-in ensures accurate data capture, compliance with privacy rules, and a rock-solid foundation for connecting with Klaviyo.
Step 3: Connecting Contact Form 7 To Klaviyo
Once your form is ready, the next step is to link it with Klaviyo so that every submission flows directly into your CRM account. This connection relies on API credentials and appropriate field mapping to ensure perfection.
Follow these steps to connect:
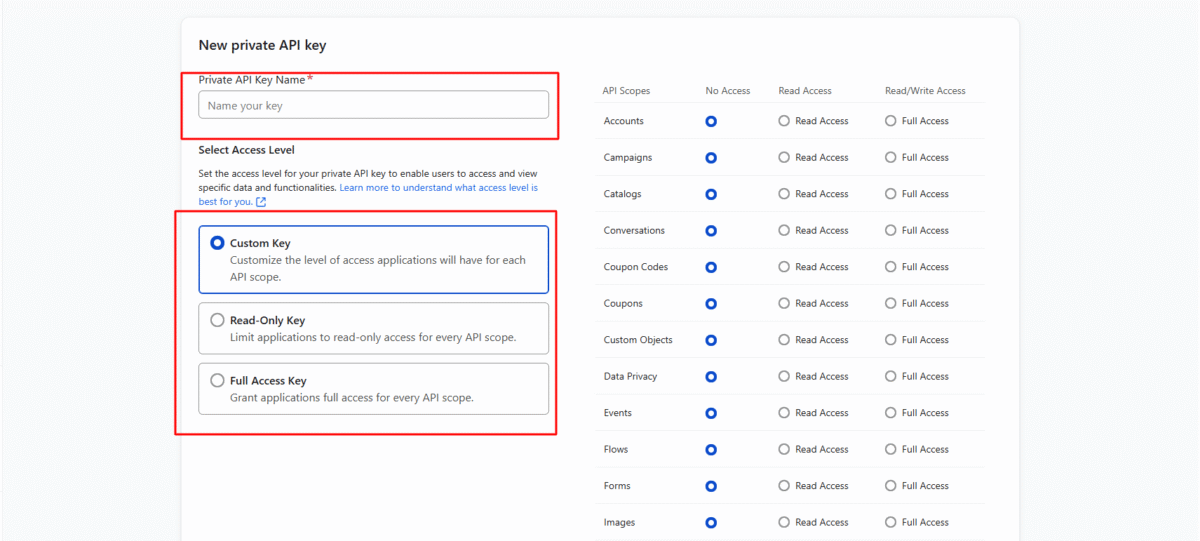
- Access your Klaviyo API Keys: Log in to your Klaviyo account, go to Account → Settings → API Keys, and generate a Private API Key. It will serve as the secure bridge between WordPress and Klaviyo.
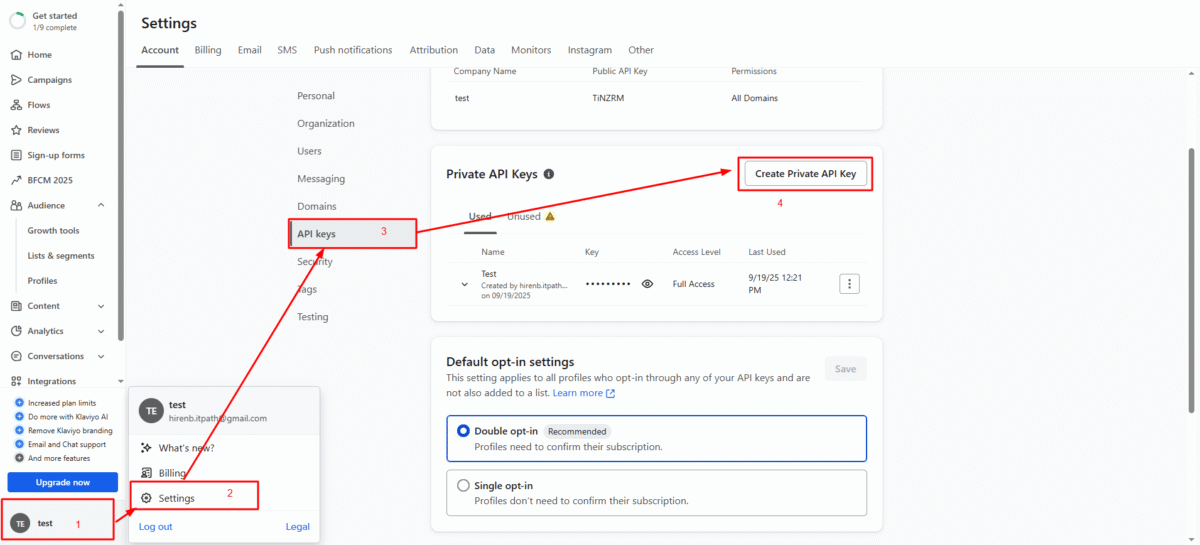
👉Note: After that, you have to enter a new private API Key, and select the access level as shown in the image below.
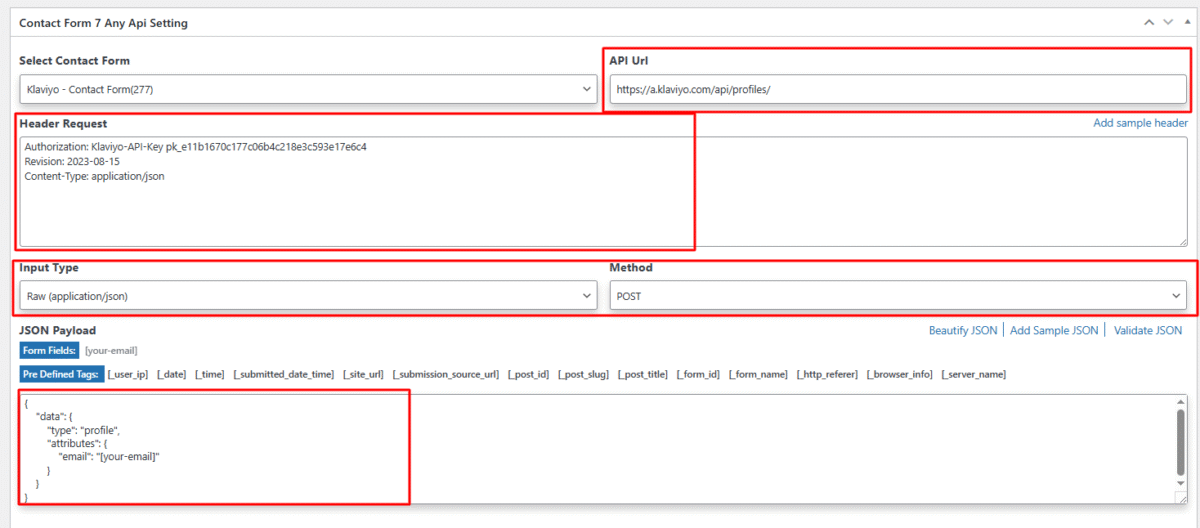
- Input API keys into the Plugin: Open the integration plugin in WordPress, then paste the API key in the settings section. It authorizes WordPress to send data directly to Klaviyo.
- Map Form Fields to Klaviyo Lists: Match your Contact Form 7 fields, such as Name, Email, and Phone, with corresponding Klaviyo fields. You can also assign each form to a specific Klaviyo list. It ensures leads are properly segmented from the start.
- Save your Configuration: Once fields are mapped, save your settings. From this point forward, every new submission from the selected form will sync with Klaviyo automatically.
This step is the core of the integration process. It transforms your WordPress form into a trustworthy entry point for new subscribers in Klaviyo.
➡️Please note that all the configurations and settings are available with the PRO version of Contact Form to Any API, available at $29.99/year.
In a Nutshell: By connecting Contact Form 7 to Klaviyo with an API key and accurate field mapping, you ensure every form submission is securely transferred, properly segmented, and instantly available for marketing automation.
Step 4: Testing The Integration
After setting up the connection, it is crucial to test whether everything works as expected. Skipping this step could result in lost data, failed automations, or duplicate records that affect your campaigns. Testing ensures your system is reliable before going live.
Here is how to test your setup:
- Submit a Test Form: Fill out your Contact Form 7 on the live website with sample data. Use a valid email address so you can verify if Klaviyo receives it correctly.
- Check Subscriber Details in Klaviyo: Log in to your Klaviyo dashboard, open the list, and confirm whether the data appears as intended. Verify that mapped fields such as Name, Email, and Phone display correctly.
- Look for API or Sync Errors: Double-check your API key, plugin configuration, and mapping settings if the data is not appearing. Some plugins also provide debug logs, which can help identify where the process failed.
- Test Multiple Entries: Submit more than one test entry to ensure that duplicate handling, list assignment, and tags are functioning as designed.
Testing at this stage saves you from issues later when hot leads start coming in, ensuring your workflows remain smooth and dependable.
The Bottom Line: Test your Contact Form 7 to Klaviyo integration by submitting sample entries, checking mapped fields, and reviewing logs. It ensures a flawless sync process, reliable workflows, and accurate data before launching real campaigns.

Contact Form 7 To Klaviyo Automation Benefits & Workflows
One of the most striking advantages of connecting Contact Form 7 with Klaviyo is the ability to put lead nurturing and customer engagement on autopilot.
Instead of manually handling each submission, you can trigger workflows that run consistently in the background. It saves time and creates memorable experiences for your audience.
Here are some powerful workflows you can set up:
- Welcome Emails for New Subscribers: Greet new contacts immediately after they submit a form. It fosters a positive first impression and cultivates trust from the start.
- Abandoned Cart Reminders for WooCommerce Users: Recover lost sales by automatically emailing shoppers who added items to their cart but never checked out.
- Member Signups and LMS Course Updates: Send onboarding messages, progress updates, and renewal reminders to keep members or students engaged throughout their journey.
- Lead Nurture and Win-Back Campaigns: Tag leads based on interest and guide them through personalized content. For inactive subscribers, use re-engagement campaigns to revive interest.
By aligning workflows with your business goals, you ensure every form submission becomes the beginning of a meaningful, automated interaction that moves contacts closer to conversion.
Main Point: Automating workflows with Contact Form 7 and Klaviyo enables you to welcome subscribers, recover abandoned carts, update members, and nurture leads. It turns every form entry into a carefully timed and highly relevant customer interaction.
Here is something you may find worth reading on how to set up Contact Form 7 with ActiveCampaign Marketing Automation Workflows.
Advanced Contact Form 7 To Klaviyo Integration Strategies
Once the essentials are in place, you can take your integration further with next-level strategies that improve tracking, segmentation, and flexibility. These techniques help you extract more value from every form submission and strengthen your Klaviyo campaigns.
Here are strategies worth implementing:
- Use Hidden Fields for Tracking: Add hidden fields to capture UTM parameters, referral sources, or landing page URLs. It enables you to measure campaign performance and tailor messages based on where leads came from.
- Apply Conditional Logic for Segmentation: Configure your form to assign different tags or add subscribers to specific lists based on their responses. It ensures more relevant targeting and personalized communication.
- Explore API or Webhook Methods: For businesses that require more profound control, a direct API connection or webhook setup can bypass plugins and send data directly into Klaviyo. Though this option is more technical, it offers unmatched flexibility.
- Stay Updated with Plugin Improvements: Integration plugins evolve to include new Klaviyo features such as cutting-edge consent handling and data privacy tools. Keep your plugin up-to-date to take advantage of these enhancements.
These strategies transform your integration from a simple data sync into a robust system that supports detailed analytics, personalization, and scalability.
The Crux: Advanced integration strategies such as hidden fields, conditional logic, direct API connections, and plugin updates give you deeper control over data, more innovative segmentation, and a future-ready system for Klaviyo campaigns.
Troubleshooting Common CF7–Klaviyo Issues
Even with the appropriate setup, integrations can sometimes turn into problems. Knowing what to look for and how to resolve it quickly ensures your leads continue flowing into Klaviyo without interruptions.
Here are typical problems and their respective solutions:
- API Key Errors: If your integration fails, validate that you are using a Private API Key from Klaviyo. Check permissions and re-enter the key in the plugin settings.
- Field Mapping not working: If data isn’t displaying in the correct fields, review your field labels in Contact Form 7 and ensure they match the fields in Klaviyo. Consistency is pivotal.
- Duplicate Subscribers: When the same data appears multiple times, enable the “update existing contact” option in your plugin. It ensures records are updated instead of duplicated.
- Missing Form Submissions: If entries are not syncing, verify that the correct form is connected. Moreover, also test the plugin configuration and use any available debug logs to identify underlying bottlenecks.
Addressing these concerns early will keep your workflows accurate and reliable, preventing disruptions to your marketing campaigns.
Knowledge Drop: You can quickly troubleshoot Contact Form 7 and Klaviyo integration issues by checking API keys, ensuring correct field mapping, preventing duplicates, using debug logs, and maintaining a tranquil flow of subscriber data.

Security, Privacy, And Compliance Essentials
Integrating Contact Form 7 with Klaviyo is not only about syncing data; it is also about handling personal information responsibly. Adherence to data protection laws fosters trust with your audience and keeps your business safe from penalties.
Here are the essentials to prioritize:
- GDPR and CCPA Compliance: If you are collecting data from users in the EU or California, ensure your forms comply with state and country-specific regulations. Add transparent privacy policies and links for users to review how their data will be used.
- Consent Checkboxes: Always include a checkbox that allows users to agree to receive marketing communications. It ensures explicit consent and protects your brand’s reputation.
- Unsubscribe Management: Make it simple for subscribers to opt out of emails by syncing your forms with Klaviyo’s unsubscribe processes. A straightforward unsubscribe path builds credibility and reduces spam complaints.
- Data Retention Policies: Regularly review the duration for storing subscriber data. Delete outdated or inactive records to minimize risks and ensure conformity to data minimization principles.
What You Should Know: By adding consent checkboxes, managing unsubscribe workflows, and adhering to GDPR and CCPA standards, you ensure your Contact Form 7 to Klaviyo integration is secure, compliant, and trusted by your subscribers.
Best Practices For CF7 To Klaviyo Integration To Maximize Results
Setting up your integration is only the beginning. To genuinely maximize results, you need to refine how you capture leads, segment them, and keep your workflows running efficiently. These best practices help you derive the most out of Contact Form 7 and Klaviyo working in harmony.
Here are proven practices to follow:
- Optimize Forms for Higher Conversions: Keep your forms short, crisp, and easy to complete. The fewer barriers for users, the more likely they are to submit their details.
- Segment Contacts Effectively: Use tags, custom fields, and list assignments to create meaningful groups in Klaviyo. Segmentation ensures that your campaigns are relevant and increase engagement.
- Monitor and Test Workflows Regularly: Perform test submissions frequently to verify that automations, field mappings, and consent checkboxes continue working as intended. It helps prevent unexpected errors.
- Compare and Select the Right Plugin: Evaluate plugins from a feature, compliance, and long-term support perspective. While several options exist, Contact Form to Any API offers strong mapping control, reliable updates, and integration flexibility.
When you consistently apply these practices, your integration becomes more than a data pipeline. It evolves into a dependable system that fuels superior campaigns and more meaningful customer relationships.
Essential Insight: Maximizing Contact Form 7 to Klaviyo integration involves optimizing forms, segmenting effectively, monitoring workflows, and selecting the ideal plugin. It creates a sustainable and high-performing email marketing system.
Here is something you may find worth reading on Best Practices to make your CF7 to ERP Integration Bulletproof.
Real-World Use Cases Of Contact Form 7 To Klaviyo Integration
Understanding how Contact Form 7 and Klaviyo work together in actual business contexts makes the integration even more meaningful. The following real-world use cases indicate how diverse industry verticals benefit from automated data syncing and targeted communication.
Use Case 1: WooCommerce Lead Capture
An online store uses Contact Form 7 to collect product inquiries. Every submission is added to Klaviyo, where leads are tagged for follow-up campaigns. This results in abandoned cart recovery and product launch promotions delivered at the right time.
Use Case 2: Membership Signup Flows
A membership-based website syncs forms with Klaviyo for onboarding new members. Automated welcome messages, renewal reminders, and exclusive content updates keep members engaged and reduce churn rate.
Use Case 3: Event Registration with Automated Follow-Ups
Event organizers capture attendee registrations through Contact Form 7. Klaviyo automations then handle reminders, confirmations, and post-event thank-you emails. It gives attendees a memorable experience while reducing manual workload.
Use Case 4: Course Enrollment Campaigns
An eLearning business connects enrollment forms to Klaviyo. Every signup triggers a drip campaign with course progress updates, tips, and upsell offers. It fosters a smooth student journey.
These scenarios highlight how integration can transform simple form submissions into automated touchpoints that nurture leads, increase engagement, and drive measurable results.
Key Takeaway: Real-world applications of Contact Form 7 and Klaviyo integration include lead capture for WooCommerce, membership onboarding, event reminders, and course enrollment campaigns. All of them aim to replace manual work with consistent, personalized automation.

Conclusion
Integrating Contact Form 7 with Klaviyo is primarily about creating a dependable bridge between your website and your email marketing system. With this connection, every lead captured through your forms becomes an opportunity to engage, segment, and automate without delays or uncertainty.
In this guide, we explored why the integration matters, the benefits it brings, the steps to set it up, and advanced strategies that move beyond the basics. From compliance essentials to real-world use cases, the goal is to shift your forms from being passive entry points to active drivers of business growth.
We recommend considering the paid version of Contact Form to Any API for a smooth, precise, and future-ready integration. It offers advanced mapping, timely updates, and compliance features to equip you with the superior control and flexibility needed to derive the most from Klaviyo.
If you ever need expert assistance in integrating Klaviyo with Contact Form 7 or have questions along the way, we are just a message away.
Now is the time to build workflows that transform form submissions into meaningful interactions. With the proper setup, your WordPress site can deliver personalized campaigns, enhanced engagement, and measurable results.
FAQ
Can I Integrate Contact Form 7 With Klaviyo Without A Plugin?
Yes, you can integrate without a plugin by using webhooks or custom API scripts. However, this method requires coding knowledge and ongoing professional maintenance. For most users, a dedicated plugin like Contact Form to Any API is more efficient, trusted, and manageable.
Should I Use Single Or Double Opt-In In Klaviyo?
Double opt-in is recommended for compliance and better list quality, as it ensures subscribers confirm their intent. Single opt-in works for expanding the growth list, but can increase spam signups. Select based on your business goals and regulatory requirements.
How To Send File Uploads From CF7 To Klaviyo?
Klaviyo does not store uploaded files directly. Instead, configure your plugin to send file URLs or links collected through Contact Form 7 into custom fields in Klaviyo. It enables you to track and reference files without storing them in the platform.
How To Connect Multiple CF7 Forms To Different Klaviyo Lists?
Most integration plugins, including Contact Form to Any API, allow you to map individual forms to specific Klaviyo lists. You can configure each form separately, assign different tags, and direct leads into distinct workflows for targeted segmentation.
How To Fix Contact Form 7 Leads Not Syncing With Klaviyo?
Begin by verifying your API key permissions and rechecking field mapping. Ensure the correct form is synced in your plugin settings. If the issue persists, submit test entries, review plugin logs, and update to the latest version to fix sync errors.
Is Contact Form 7 Klaviyo Integration GDPR Compliant?
Yes, it can be GDPR compliant if you add a consent checkbox to your forms, provide a transparent privacy policy, and enable unsubscribe management in Klaviyo. Compliance depends on how you configure your forms, not just the integration itself.
What Data Fields Can Contact Form 7 Send To Klaviyo?
Contact Form 7 can send standard fields such as name, email, and phone, as well as custom fields like company, source, or preferences. With advanced plugins, you can also pass tags, hidden fields, and UTM parameters for detailed segmentation.
