

If you’re using Contact Form 7, you already have leads coming in. The real problem usually starts after submission. Manually exporting entries, delayed follow-ups or forms that never make it into your email system quietly cost you momentum.
This setup fixes that.
Below is the simplest way to send Contact Form 7 submissions directly into Brevo using CF7 to Any API, without writing code or relying on third-party automation tools.
Watch the Setup (2 mins)
Watch this once, then follow the steps below at your own pace.
What You’ll Need
Before you start, make sure you have:
- A Brevo account
- Contact Form 7 installed and active
- CF7 to Any API installed and active
That’s all.
Step 1: Generate Your Brevo API Key
- Log in to your Brevo account.
- Go to: Settings → SMTP & API
- Open API Keys, then generate a new key.
- Give it a clear name so you know exactly what it’s for, for example: CF7 Integration
- Copy the API key and keep it safe. You’ll need it during the WordPress setup.

Brevo API Keys screen showing “Generate a new API key”
Step 2: Create a New Integration in WordPress
- Now switch to your WordPress dashboard.
- Navigate to: CF7 to Any API → Add New Integration
- Give your integration a clear, descriptive title. This helps later if you manage multiple forms or tools.
Step 3: Add Brevo Headers
Brevo requires specific headers to authenticate and accept incoming data.
- Go back to Brevo and open: Help → API Documentation
- Inside the documentation, open: Create an email campaign
- You’ll see sample header code there. This typically includes:
- API key authorization
- Content-Type set to application/json
- Copy the header code exactly as shown.
- Paste this code into the Headers field inside CF7 to Any API.
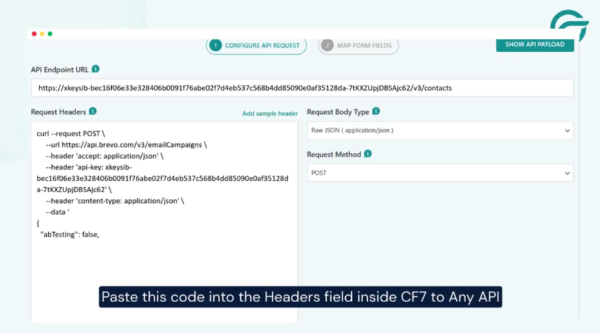
CF7 to Any API Headers field with Brevo authorization and Content-Type added
This step is critical. If the headers are wrong, Brevo will reject the request.
Step 4: Select Your Contact Form
Click Next and choose the Contact Form 7 form you want to connect to Brevo.
This defines which form submissions should be sent automatically.
Step 5: Configure the Request and Map Fields
Now map your Contact Form 7 fields to the fields Brevo expects.
Common examples include:
- Name
- Message
CF7 to Any API lets you structure this request visually, so you don’t need to work with raw JSON.
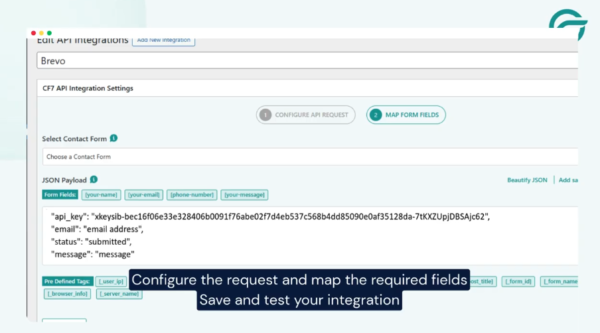
Field mapping screen showing CF7 fields mapped to Brevo fields
Double-check field names before saving.
Step 6: Save and Test
Save the integration, and submit a test entry through your Contact Form 7 form.
If everything is set up correctly, the submission will appear in Brevo almost instantly.
That’s it! From this point on, every Contact Form 7 submission goes straight into Brevo.
No exports. No waiting. No extra tools in the middle. Once it’s set up, the form just works in the background, the way it should.
