

A CF7 Zapier integration plugin lets businesses automatically send Contact Form 7 submissions to Zapier the moment a visitor fills out a form. Contact Form to Any API connects directly with Zapier Webhooks without any middleware, third-party automation tools, or custom code
Best CF7 Zapier integration Plugin for WordPress
Many businesses rely on Contact Form 7 to capture leads, inquiries, and customer requests on their WordPress websites while using Zapier to connect those submissions to CRMs, spreadsheets, email tools, and hundreds of other applications. Without automation, teams often depend on manual data entry or multiple disconnected tools to move form submissions across systems, which slows down workflows and increases the risk of losing leads.
Zapier simplifies this by acting as a bridge between Contact Form 7 and thousands of apps through webhook-based automation. With Contact Form to Any API, you can directly send form submissions from WordPress into Zapier in real time, triggering workflows that update CRMs, send emails, store data in Google Sheets, or power complex multi-step automations.
This integration is widely used for lead routing, sales automation, marketing workflows, support ticket creation, and internal notifications where Contact Form 7 submissions need to trigger actions across multiple platforms instantly.
In this guide, you’ll learn how to connect Contact Form 7 with Zapier using the Contact Form to Any API plugin, configure webhook endpoints, map form fields, and build automated workflows without writing any code or relying on external middleware.
Refer to a detailed breakdown of Zapier vs Contact Form to API to know the difference in pricing, scalability, flexibility and long-term workflow management.
Watch the Video Tutorial: CF7 to Zapier Integration (Step-by-Step)
Prefer a visual walkthrough? Watch our complete step-by-step video tutorial on how to connect Contact Form 7 with Zapier using Webhooks.
👉 Watch here:
Follow the steps below to set up the integration properly.
Step 1: Create a New Integration in WordPress

- Open your WordPress dashboard.
- Navigate to → Contact Form 7 to Any API → Add New Integration.
- Add a clear title for your integration.
Example: Zapier Integration
Step 2: Create a Webhook in Zapier
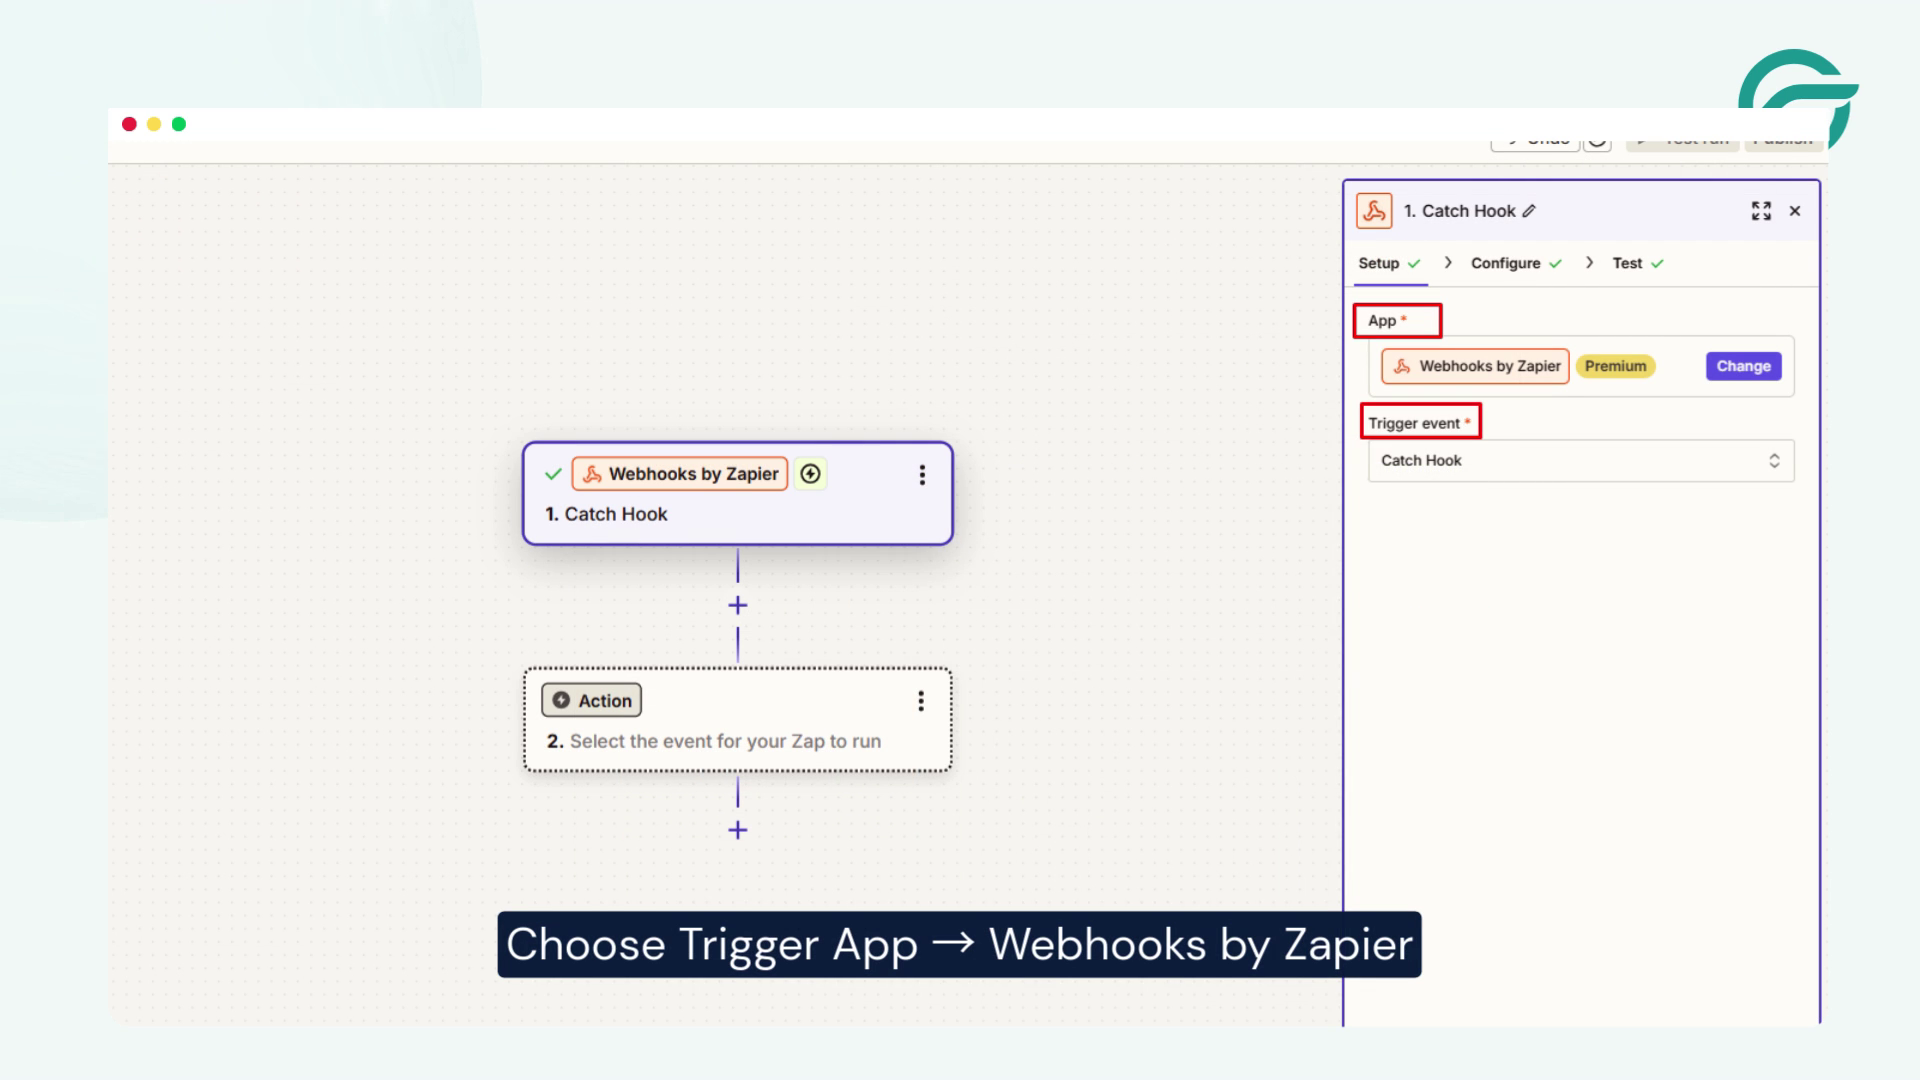
- Log in to Zapier.
- Click Create New Zap.
- Choose Trigger App → Webhooks by Zapier.
- Select Trigger Event → Catch Hook.
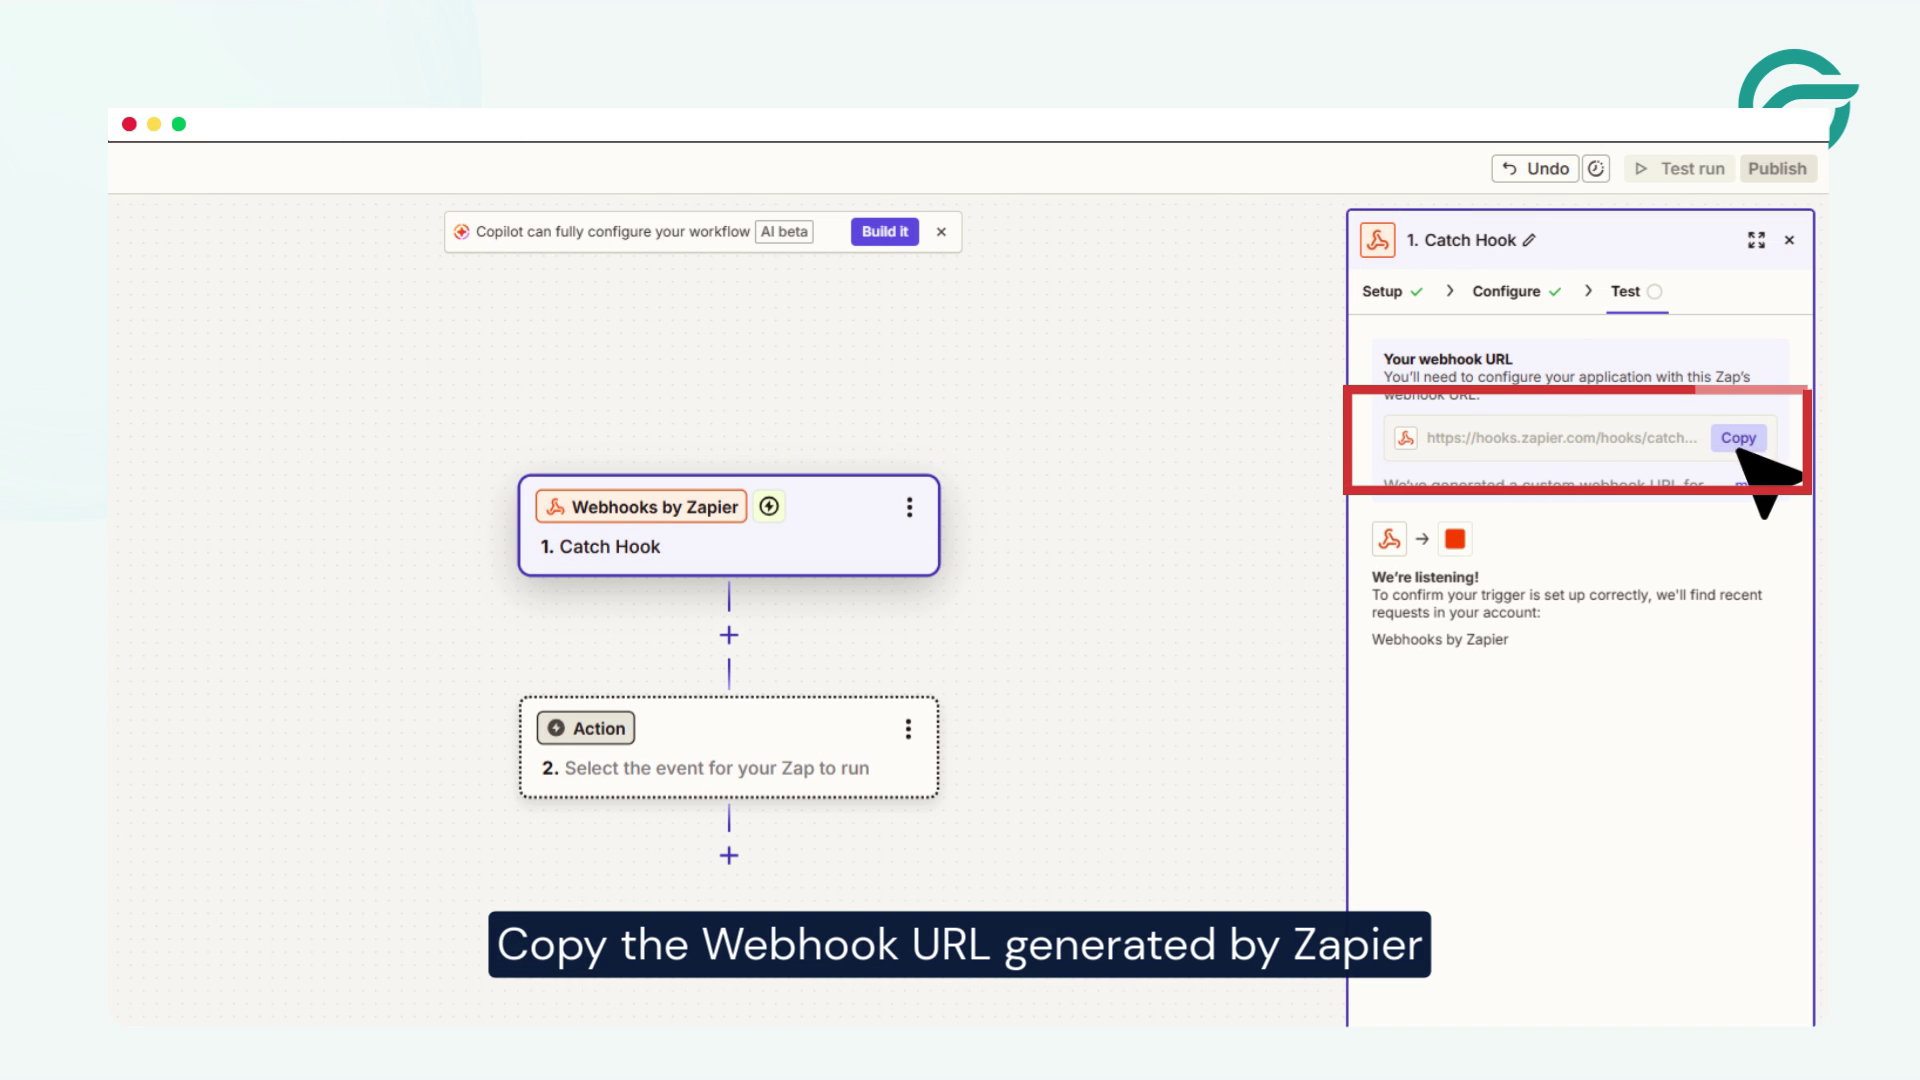
- Copy the Webhook URL generated by Zapier.
This URL will receive the data from your Contact Form 7 submission.
Step 3: Add Webhook URL in WordPress
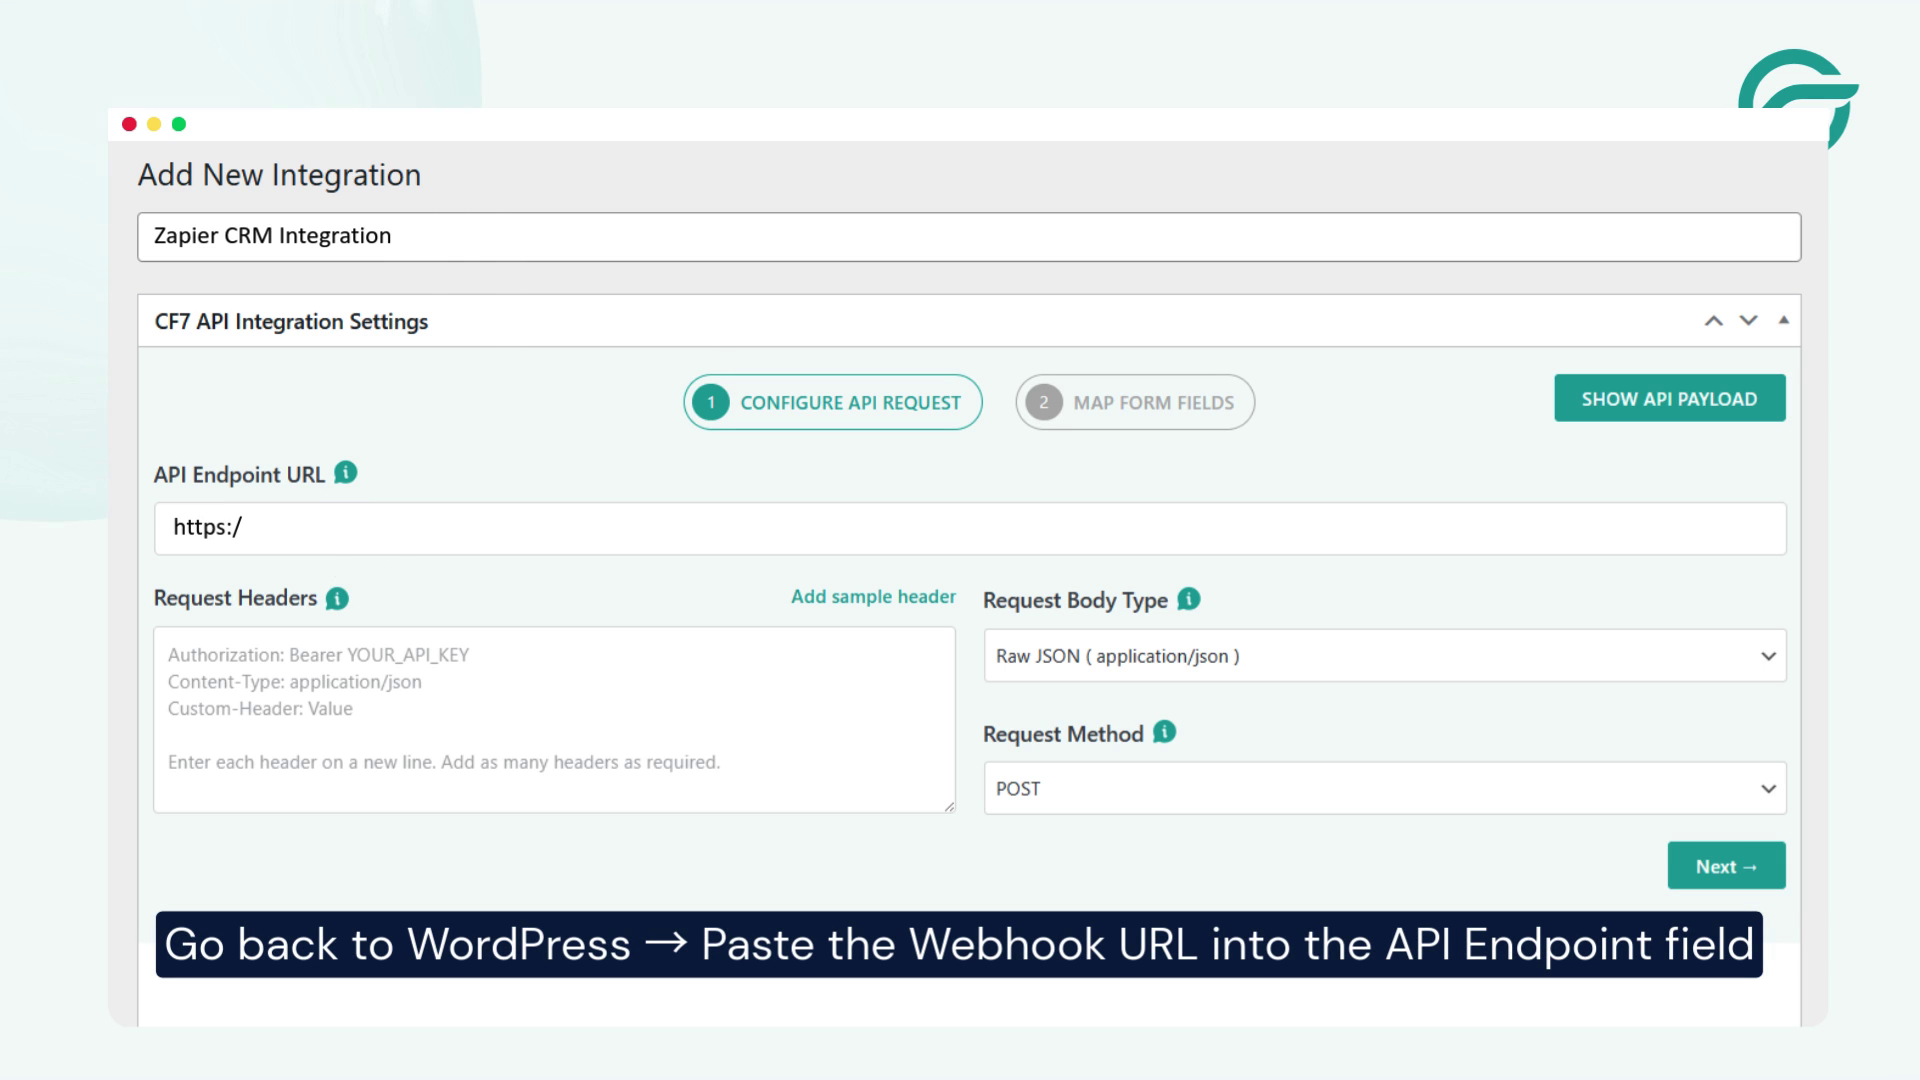
- Go back to your WordPress integration settings.
- Paste the copied Webhook URL into the API Endpoint field.
Step 4: Configure Request Headers
Under Request Headers, add:
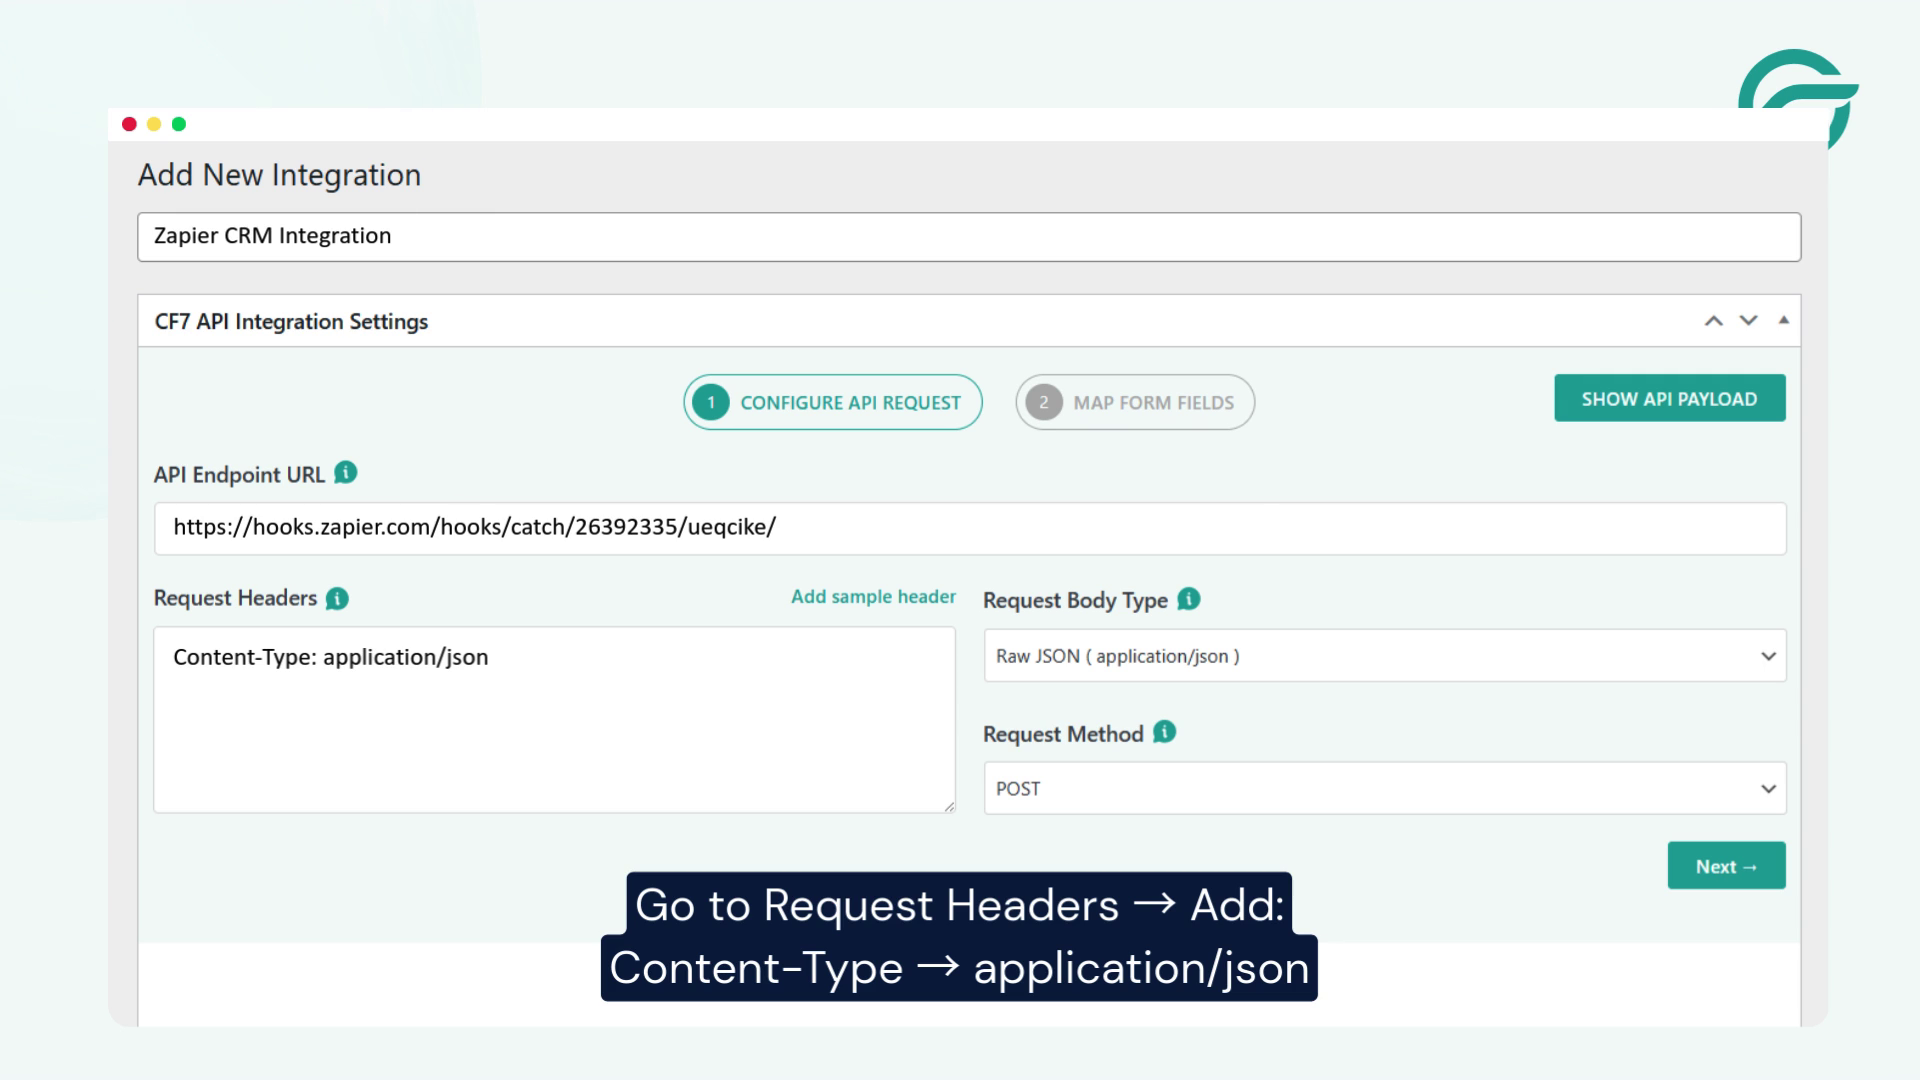
- Content-Type → application/json
This ensures the form data is sent in JSON format to Zapier.
Step 5: Select Your Contact Form
Choose the Contact Form 7 form you want to connect with Zapier.
Only submissions from this selected form will trigger the automation.
Step 6: Map Form Fields to JSON
Map your form fields into a structured JSON format.
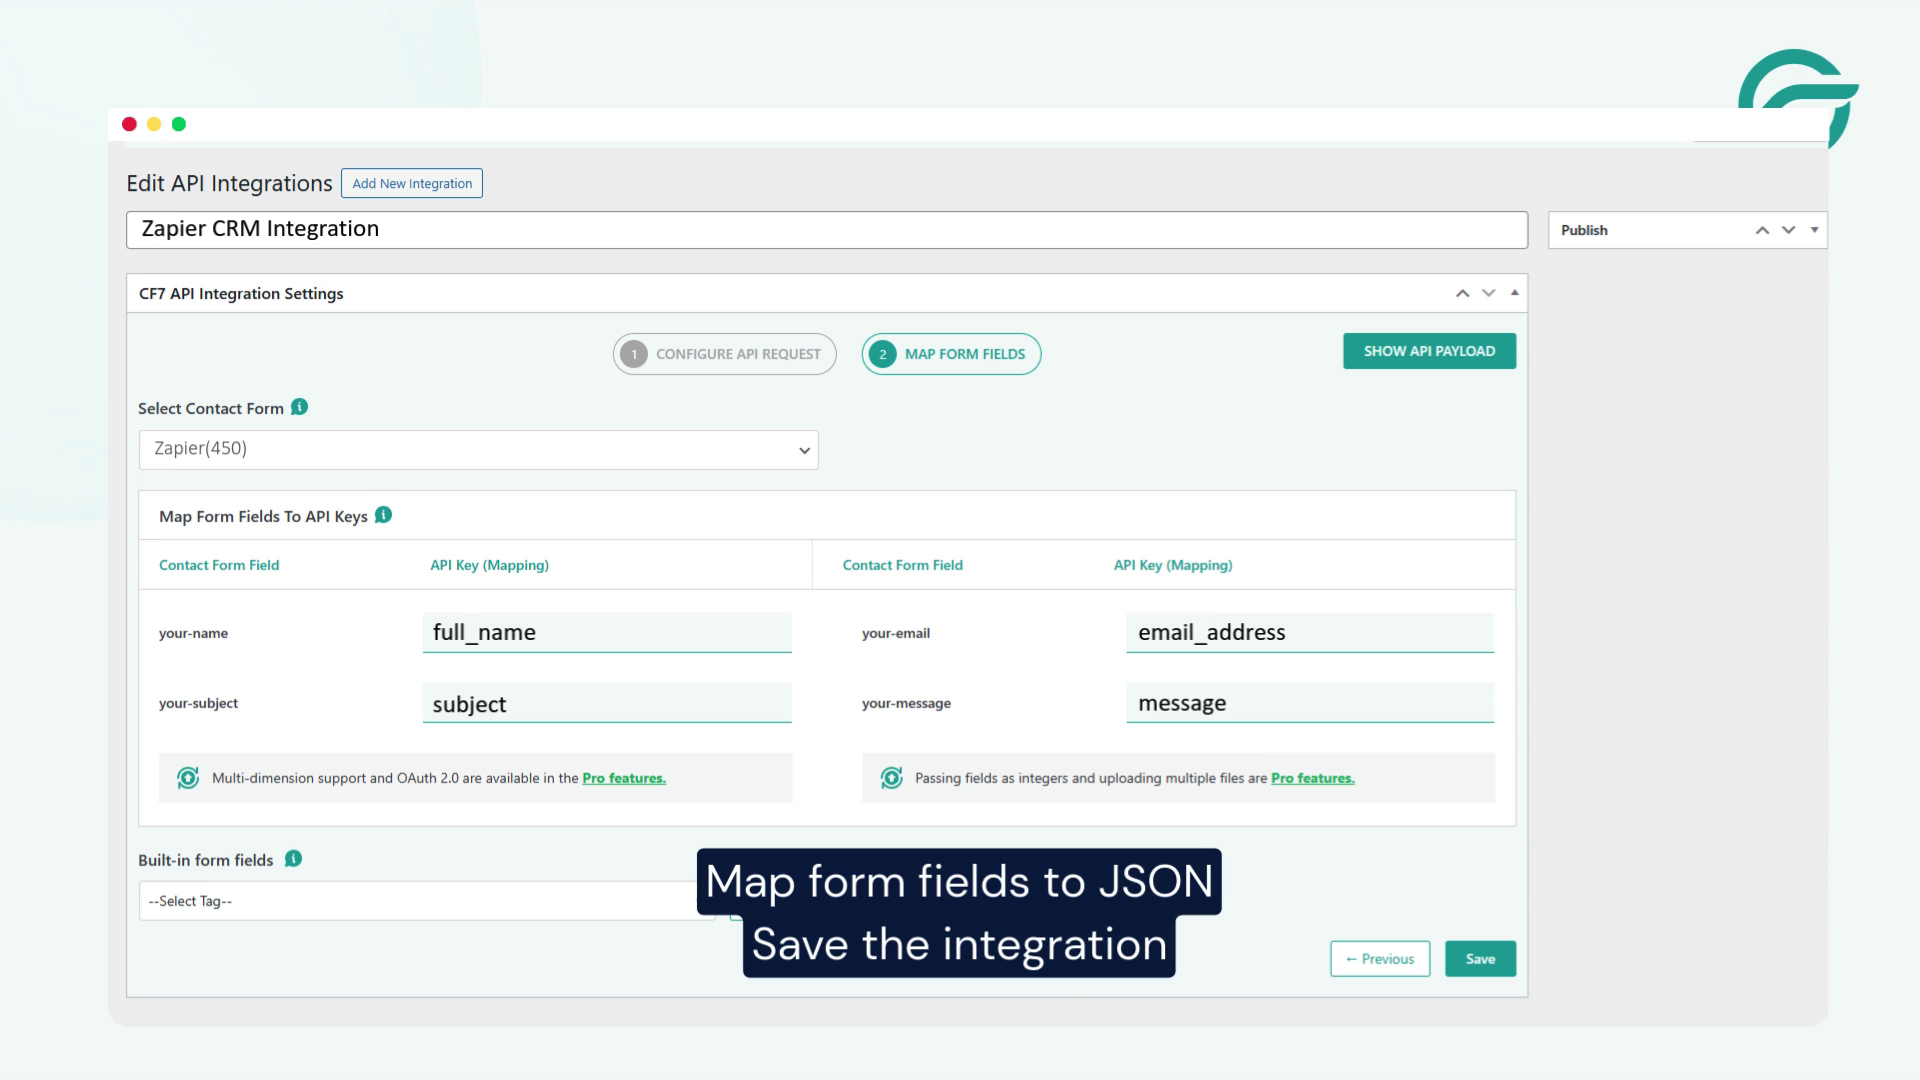
For example:
- Name
- Subject
- Message
Proper field mapping ensures Zapier receives clean and usable data.
Step 7: Save and Test the Integration
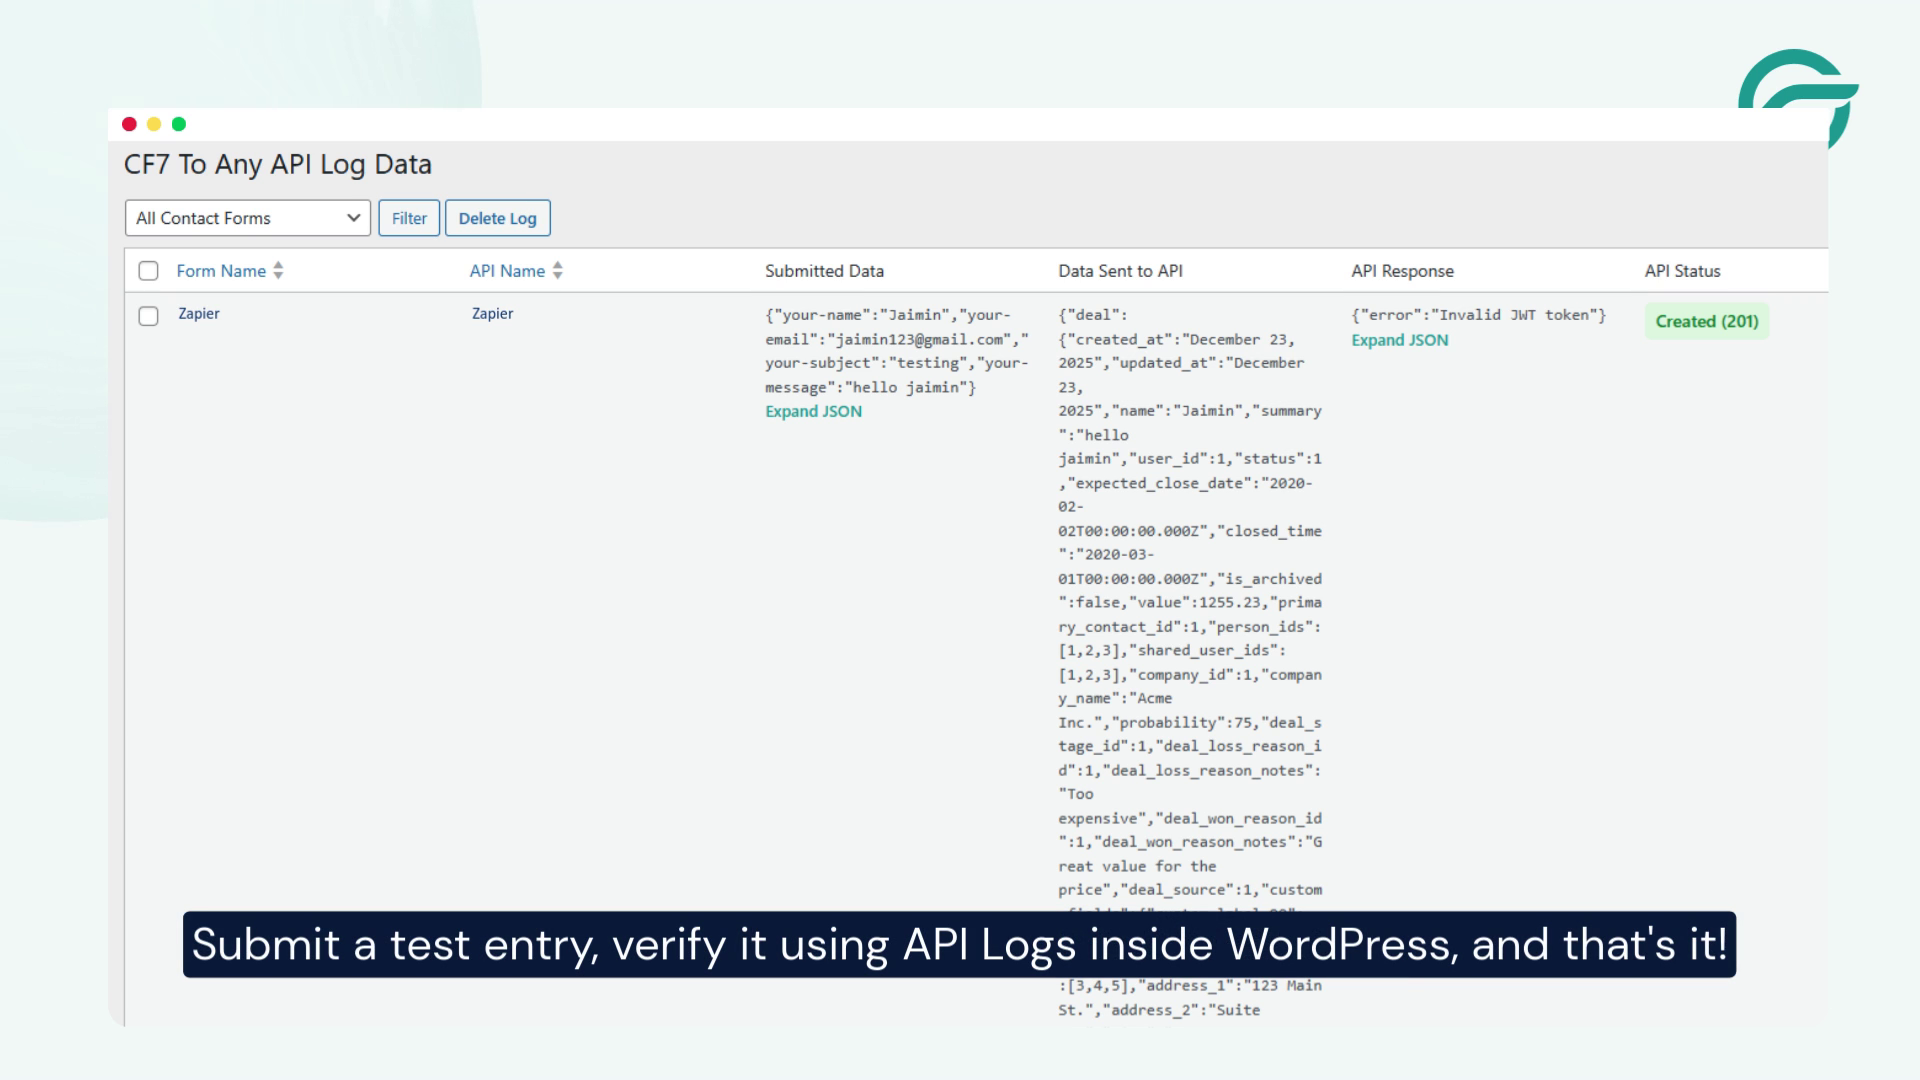
- Click Save Integration.
- Submit a test entry using your form.
- Verify the request inside API Logs in WordPress.
Final Steps in Zapier
Now go back to Zapier to complete the workflow:
1. Test the Trigger
Click Test Trigger and confirm that form submission data is received.
2. Choose an Action App
Select the app where you want to send the data, such as:
- Google Sheets
- CRM tools
- Email platforms
- Project management apps
3. Map the Fields
Map the incoming webhook fields to your selected app’s fields.
4. Publish the Zap
Once everything looks correct, click Publish Zap.
That’s it 🎉 Your Contact Form 7 submissions are now automatically connected to Zapier workflows.
Conclusion
The Zapier integration setup for Contact Form 7 works exactly the way most users expect it to. Once connected, it becomes easy to move form submissions into other platforms without writing custom backend logic or maintaining separate integrations manually.
For smaller workflows or teams already operating inside the Zapier ecosystem, this setup is usually enough to get moving quickly. The convenience is obvious, especially when you need to connect multiple apps together in a short amount of time.
Where things start becoming less obvious is over the long run. As workflows grow, task usage increases, automations become layered, and the number of connected systems expands, many website owners begin reconsidering whether they actually need a middleware platform sitting between Contact Form 7 and their APIs at all.
That is usually the point where direct API integrations start becoming part of the conversation — not because Zapier stops working, but because the ongoing costs, dependency chain, and workflow complexity begin growing faster than expected.
Before scaling your automation stack further, considering a comparision between Contact Form to API and Zapier can be a smart choice in long run. It gives a much clearer picture of when Zapier makes sense, when it does not, and what changes once your workflows move beyond basic automation.
Frequently Asked Questions
1. Is the Zapier integration for Contact Form 7 completely free?
Not entirely. While both Contact Form 7 and Zapier offer free plans, the limitations become noticeable fairly quickly once your website starts receiving regular submissions. Zapier’s free tier includes monthly task limits and restricted automation features, which means higher traffic websites or multi-step workflows often end up requiring a paid plan sooner than expected. For some businesses that cost is perfectly reasonable, but for others it becomes an unnecessary recurring expense, especially when the same form data could potentially be sent directly to an API without middleware.
2. What is the difference between Zapier and a direct API integration for Contact Form 7?
The biggest difference is the role of middleware. With Zapier, your form submission first passes through Zapier before reaching the final platform or application. A direct API integration skips that extra layer entirely and sends the data straight from Contact Form 7 to the destination API. Zapier is often easier for non-technical workflows involving multiple apps, but direct API integrations generally provide more control, fewer moving parts, and lower long-term operational costs when the workflow itself is relatively straightforward.
3. Can I use Contact Form 7 without Zapier at all?
Yes, absolutely. Zapier is only one way to automate Contact Form 7 submissions. Many websites use direct webhook or API-based integrations instead, particularly when they only need to send form data into a CRM, custom backend, database, or third-party service. In those cases, adding Zapier in the middle may not provide much additional value beyond convenience. If you are still having second thoughts, refering to a detailed comparision between Zapier and Contact Form to API will help you decide easily.
4. Is Zapier slower than a direct API integration?
In practical day-to-day use, the difference may not always feel dramatic for smaller workflows. However, Zapier still introduces an additional processing layer between your website and the destination service, which means the request has to travel through another platform before completion. Direct API integrations are usually leaner because the submission moves directly from Contact Form 7 to the target API endpoint. As workflows become larger or more business-critical, reducing dependency layers often becomes more important for reliability, debugging, and performance consistency.
5. When does it make sense to move away from Zapier?
Most businesses do not question Zapier during the early stages because it is convenient and fast to implement. The conversation usually changes later, when workflows become more complex and monthly task usage starts increasing. At that point, teams begin evaluating whether they still need a middleware platform for relatively simple data transfers. Moving away from Zapier typically becomes worth considering when automation costs rise steadily, workflows become difficult to maintain, or direct API integrations can accomplish the same task with fewer dependencies and lower ongoing overhead.


