

This setup guide shows you how to forward Contact Form 7 submissions to WhatsApp using the CF7 to Any API PRO plugin and Twilio’s Messaging API. The plugin handles the authenticated HTTP request; Twilio delivers the WhatsApp message. Setup takes under 5 minutes, requires no coding, and works for both admin alerts and customer-facing confirmations. By the end, every CF7 submission will trigger a WhatsApp message automatically.
Contact Form 7 is commonly used to collect leads, inquiries, bookings, and support requests on WordPress websites. By integrating it with WhatsApp, businesses can create a faster communication workflow that delivers form submission details directly to WhatsApp instead of relying only on email notifications.
With the Contact Form to API plugin and Twilio integration, businesses can send CF7 data to WhatsApp automatically through authenticated API requests triggered after each form submission. This setup makes it possible to forward Contact Form 7 submissions to WhatsApp for internal team alerts, customer confirmations, sales inquiries, and operational communication while continuing to use existing CF7 forms.
Our CF7 WhatsApp integration plugin also helps teams respond faster to inquiries, manage conversations more efficiently, and centralize customer communication within a familiar messaging platform.
How do I connect Contact Form 7 to Twilio WhatsApp Business API?
You can connect Contact Form 7 to the Twilio WhatsApp Business API in under 5 minutes using the CF7 to Any API PRO plugin — no coding required. Install the plugin, paste your Twilio Account SID and Auth Token, set the API endpoint, map your form fields to the JSON payload, and add your approved Content Template SID. Every submission fires an authenticated WhatsApp message instantly.
Why Twilio Is Used for Contact Form 7 WhatsApp Integration
Twilio is used to forward Contact Form 7 submissions to WhatsApp, because it provides the API infrastructure required to send the data to the latter easily.
The Contact Form to API plugin connects Contact Form 7 with Twilio by sending authenticated API requests after each form submission. This allows businesses to receive the data like admin notifications, customer conformations, lead management and other automated communication directly in WhatsApp without any custom development.
Reference Implementation (Video Walkthrough)
If you prefer a visual walkthrough, this video demonstrates the same CF7 to Twilio WhatsApp API configuration shown below, step by step.
What are the steps to integrate Twilio WhatsApp API with WordPress?
Step 1: Create a Twilio Account
Visit Twilio and sign up for an account. Complete email and phone verification to access the Twilio Console.
Step 2: Get Your Twilio Credentials
Inside the Twilio Console, navigate to Messaging to locate your credentials.
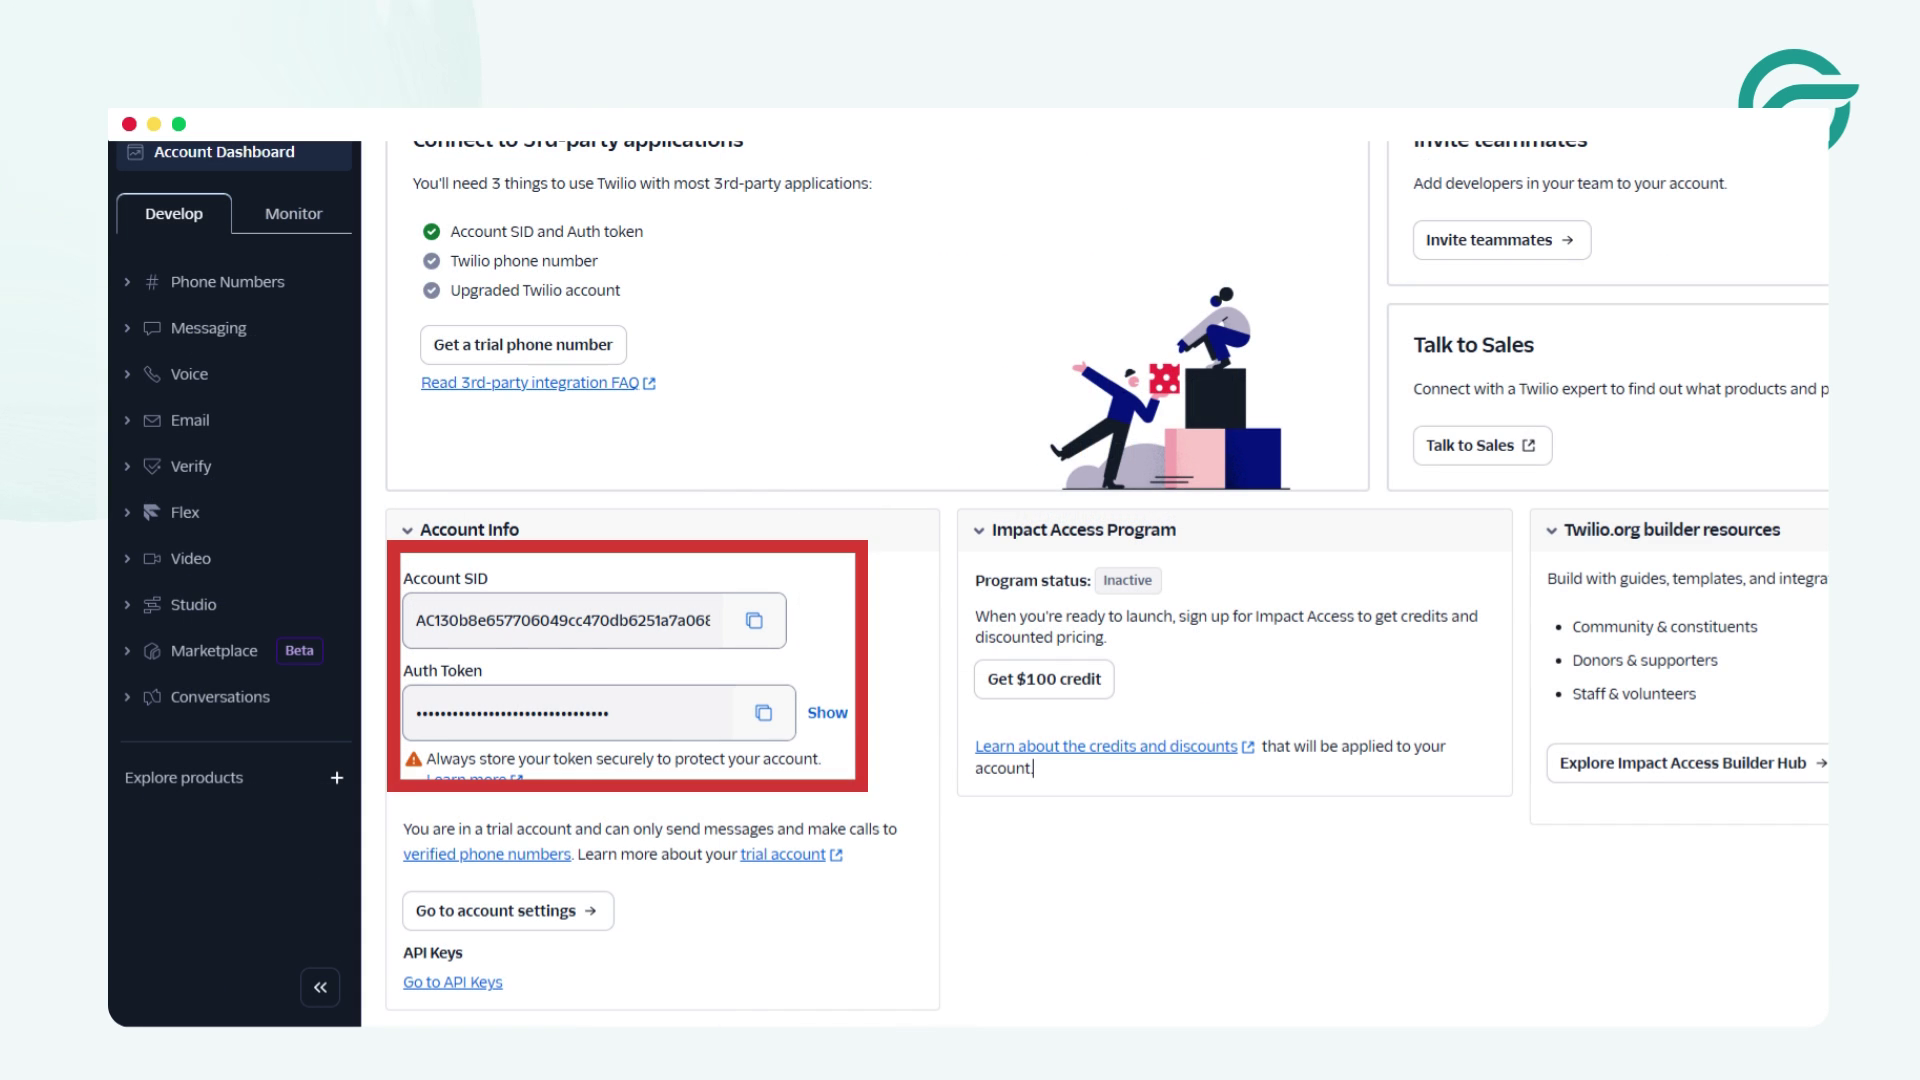
You will need:
- Account SID
- Auth Token
Twilio Identity and credential details are documented here and covered in the official Twilio WhatsApp Business API documentation. It defines how credentials authenticate message requests across WhatsApp-enabled endpoints.
These credentials are required to authenticate all API requests.
Step 3: Log in to WordPress and Create a New Integration
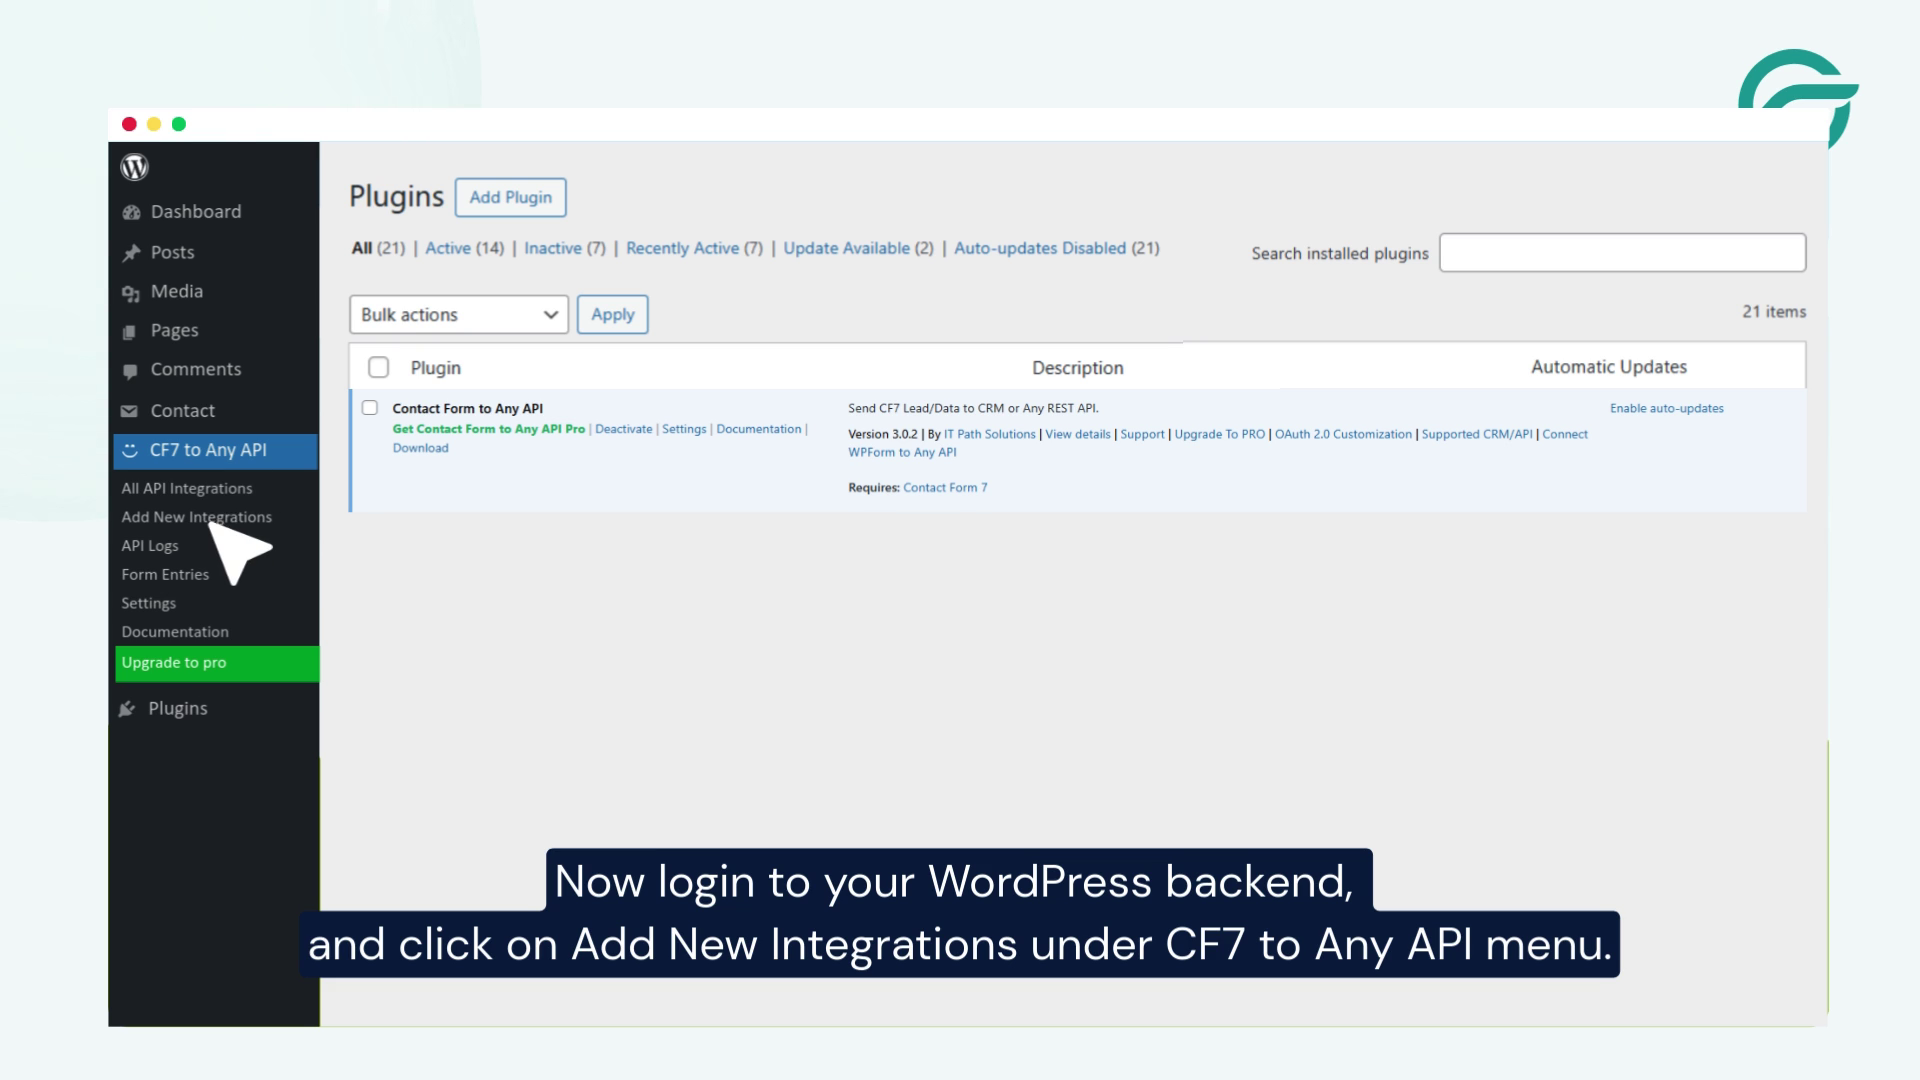
> Log in to your WordPress admin panel.
> Go to CF7 to Any API → Add New Integration.
> Give your integration a clear internal title (for example, CF7 → Twilio WhatsApp).
Step 4: Configure the API Endpoint URL
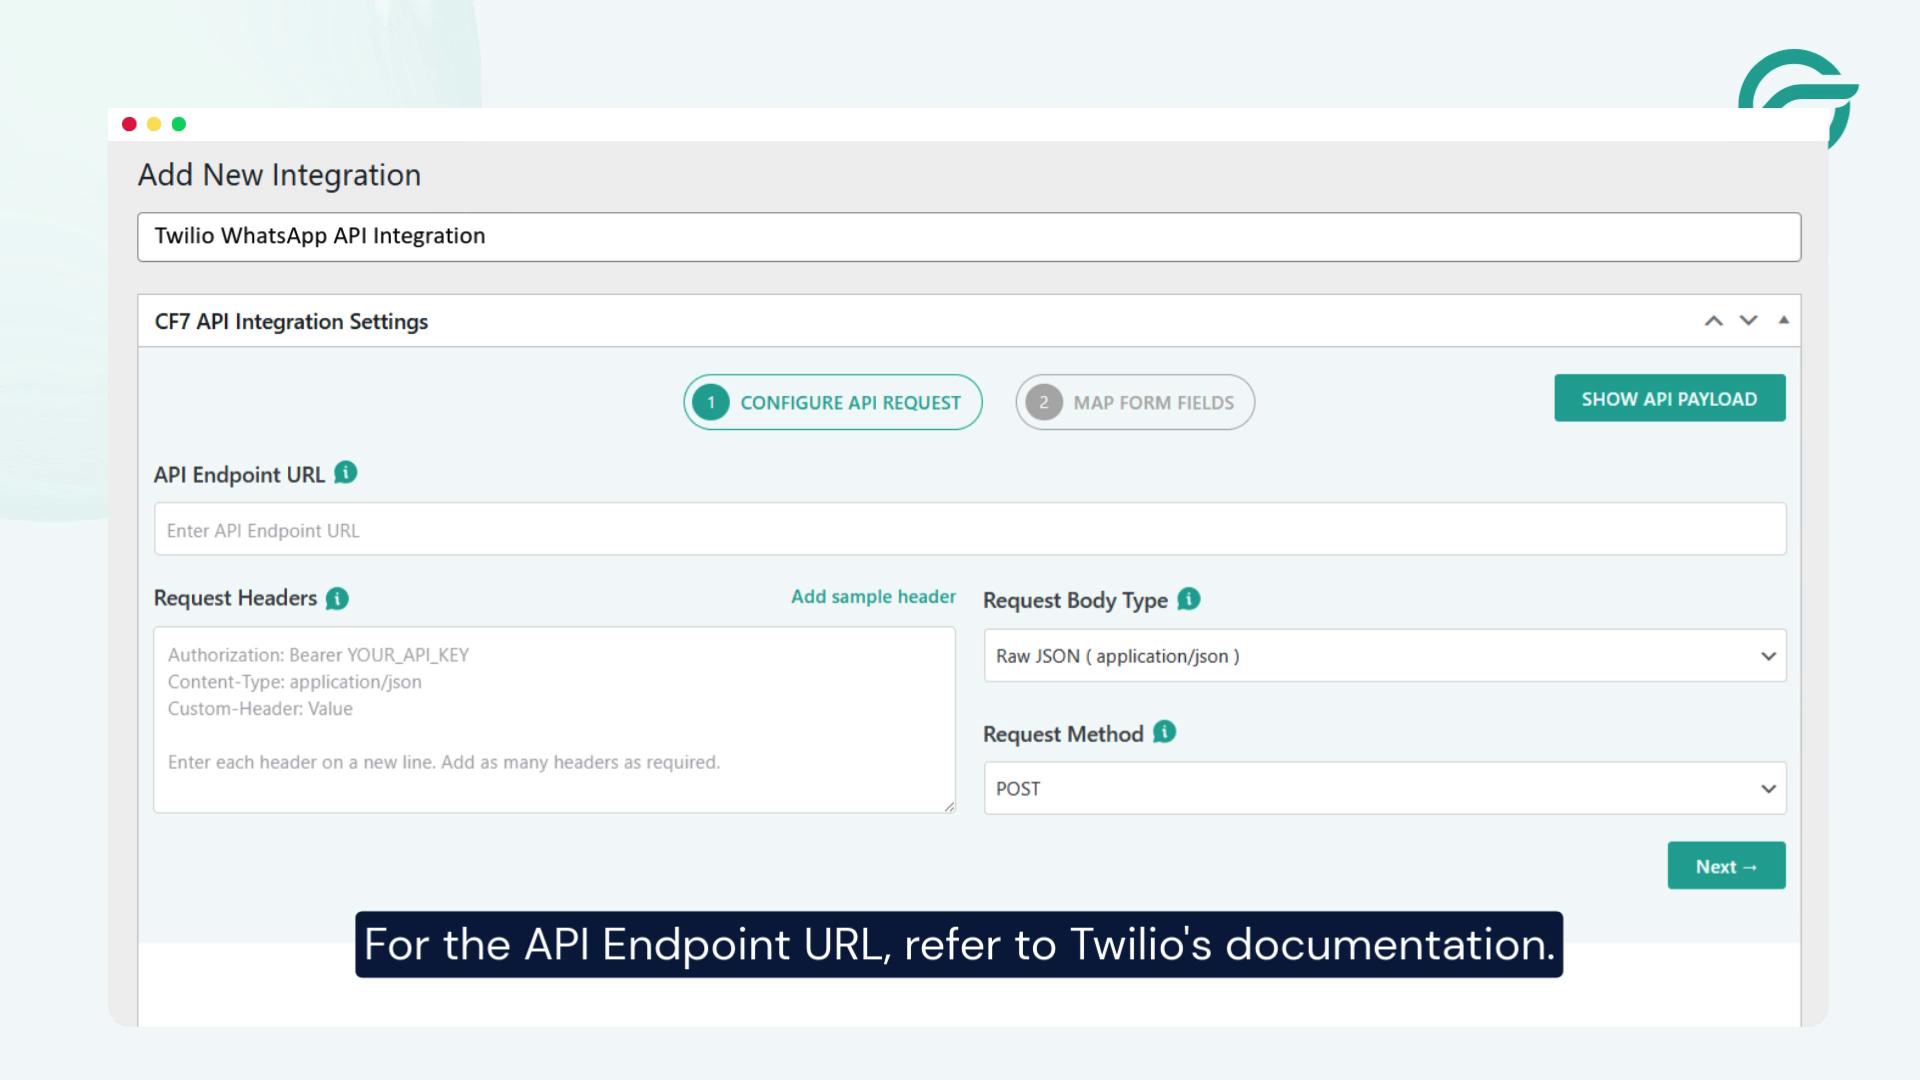
For the API endpoint, refer to Twilio’s Messaging API documentation.
Copy the required endpoint format from Twilio’s docs and paste it into the API Endpoint URL field.
A typical endpoint looks like:
https://api.twilio.com/2010-04-01/Accounts/{ACCOUNT_SID}/Messages.json
Step 5: Set the API Key
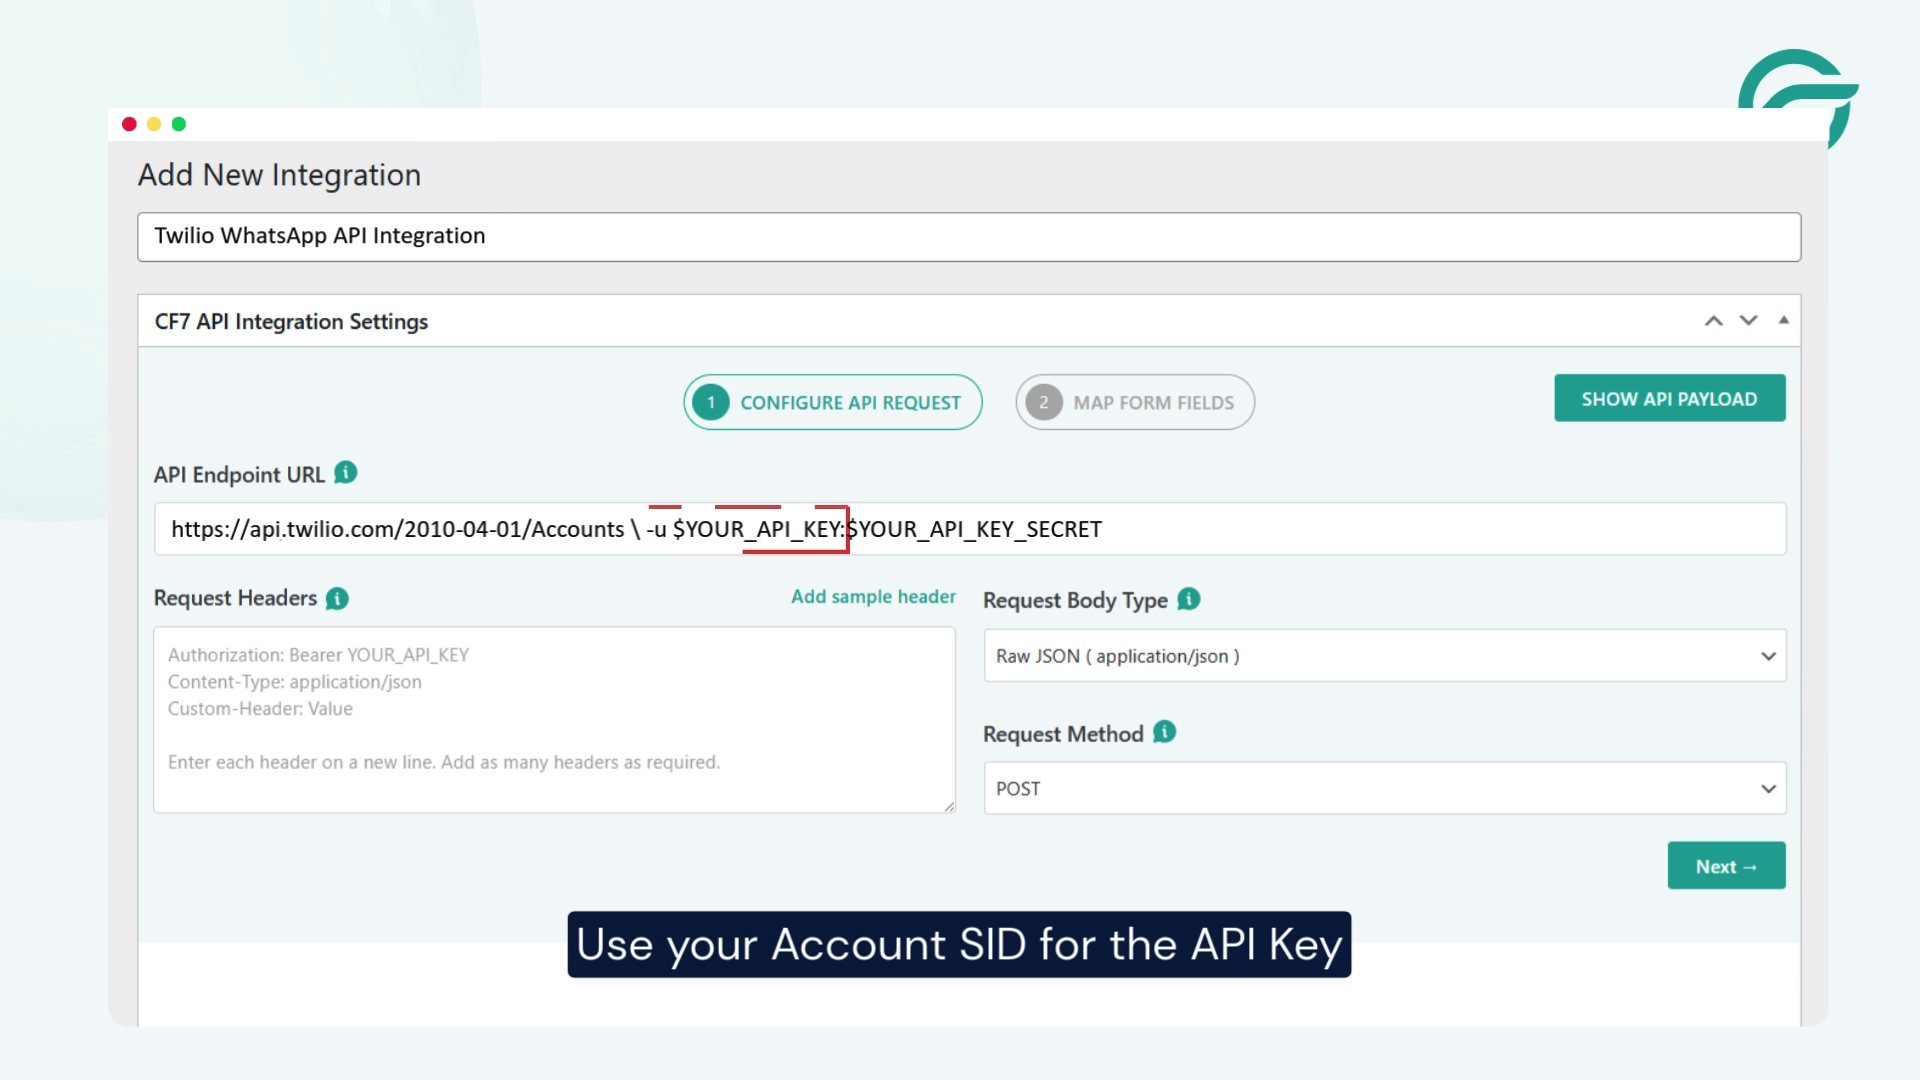
Use your Account SID as the API Key.
Paste it into the API Key field.
Step 6: Set the API Secret Key
Go back to Twilio’s documentation and locate the Auth Token used for sending messages.
Paste this value into the API Secret Key field.
For testing environments, Twilio also provides test credentials.
Step 7: Configure Request Headers (Basic Authentication)
Twilio uses HTTP Basic Authentication. To understand the authentication model, refer to Twilio’s glossary.
You will need to send an Authorization header using Base64-encoded credentials.
Step 8: Generate Base64-Encoded Credentials
Combine your credentials in this format:
ACCOUNT_SID:AUTH_TOKEN
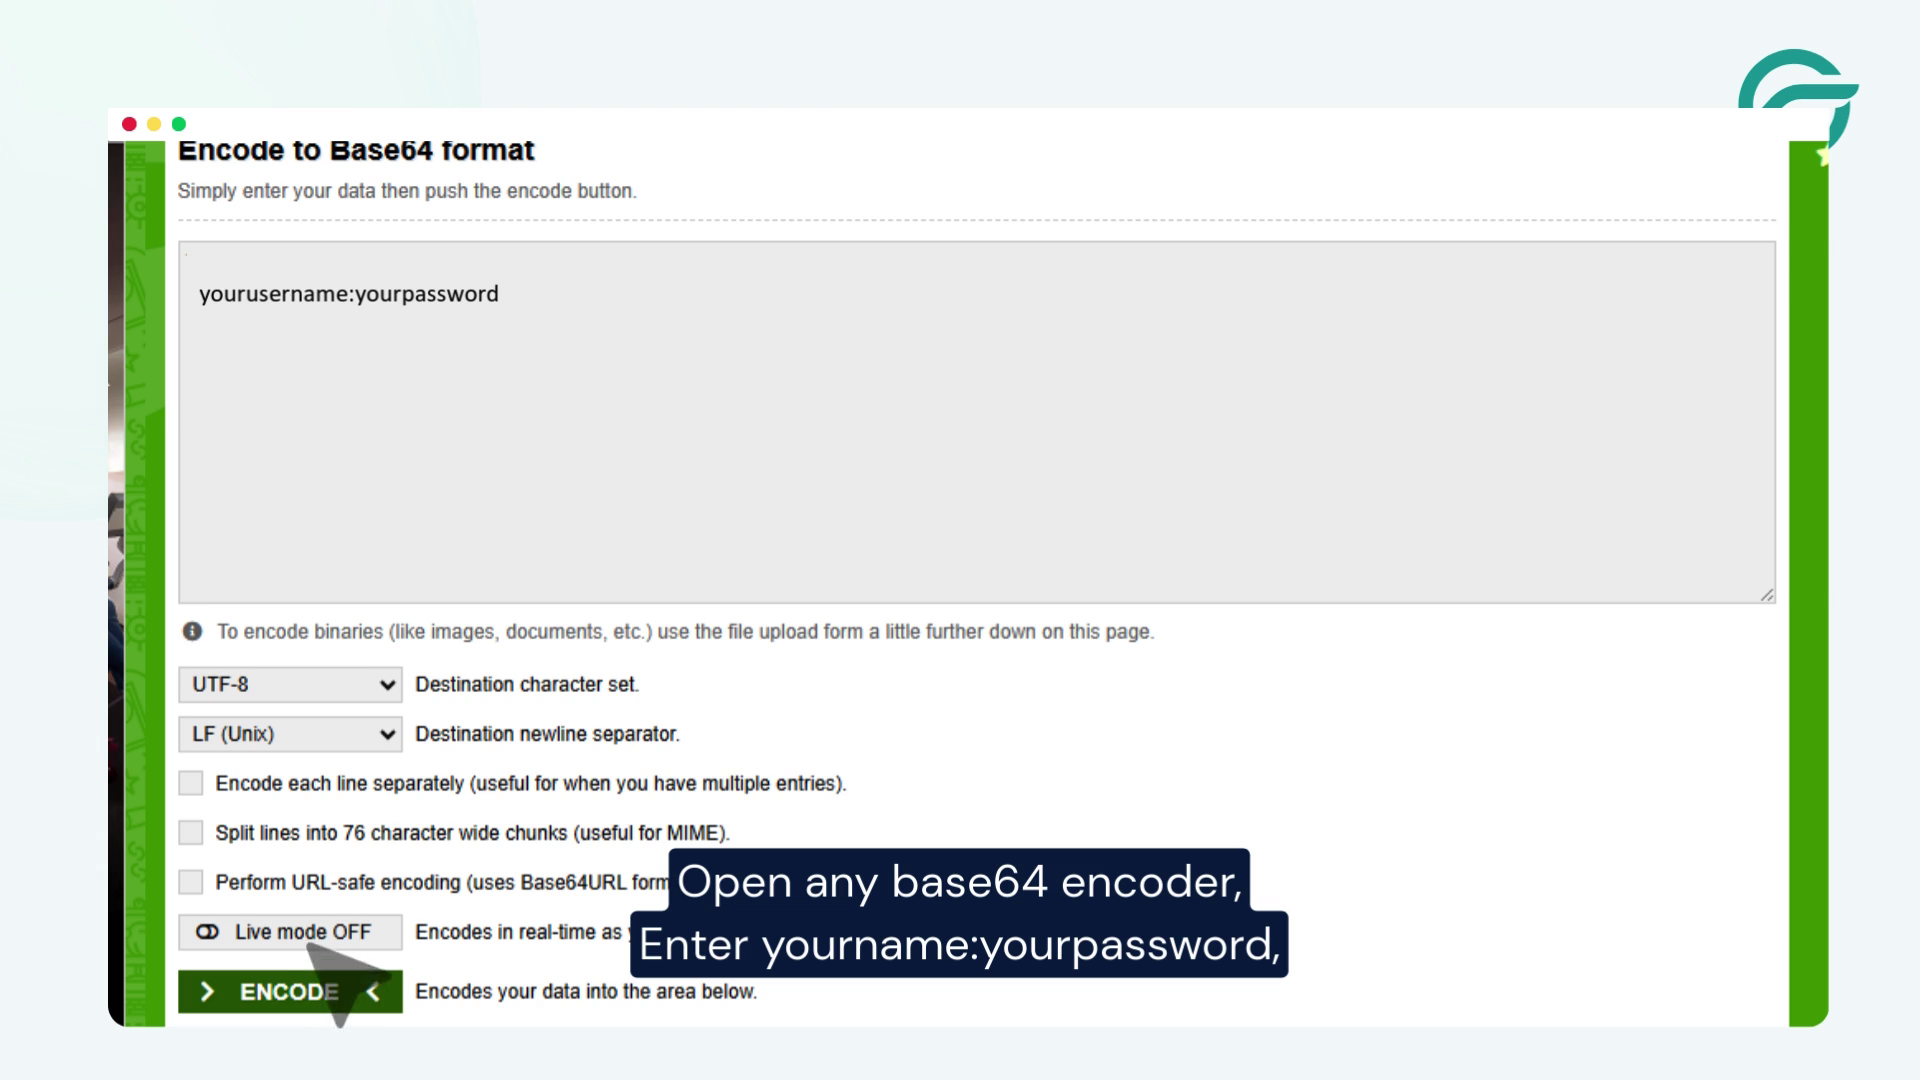
> Open a Base64 encoder.
> Paste the combined value and copy the encoded output.
> Use this output in the Authorization header:
Authorization: Basic {base64_encoded_value}
> Paste this into the Request Headers field in CF7 to Any API.
Step 9: Select the Contact Form
Choose the Contact Form 7 form you want to trigger the WhatsApp message.
In this example, the WhatsApp (138) form is selected.
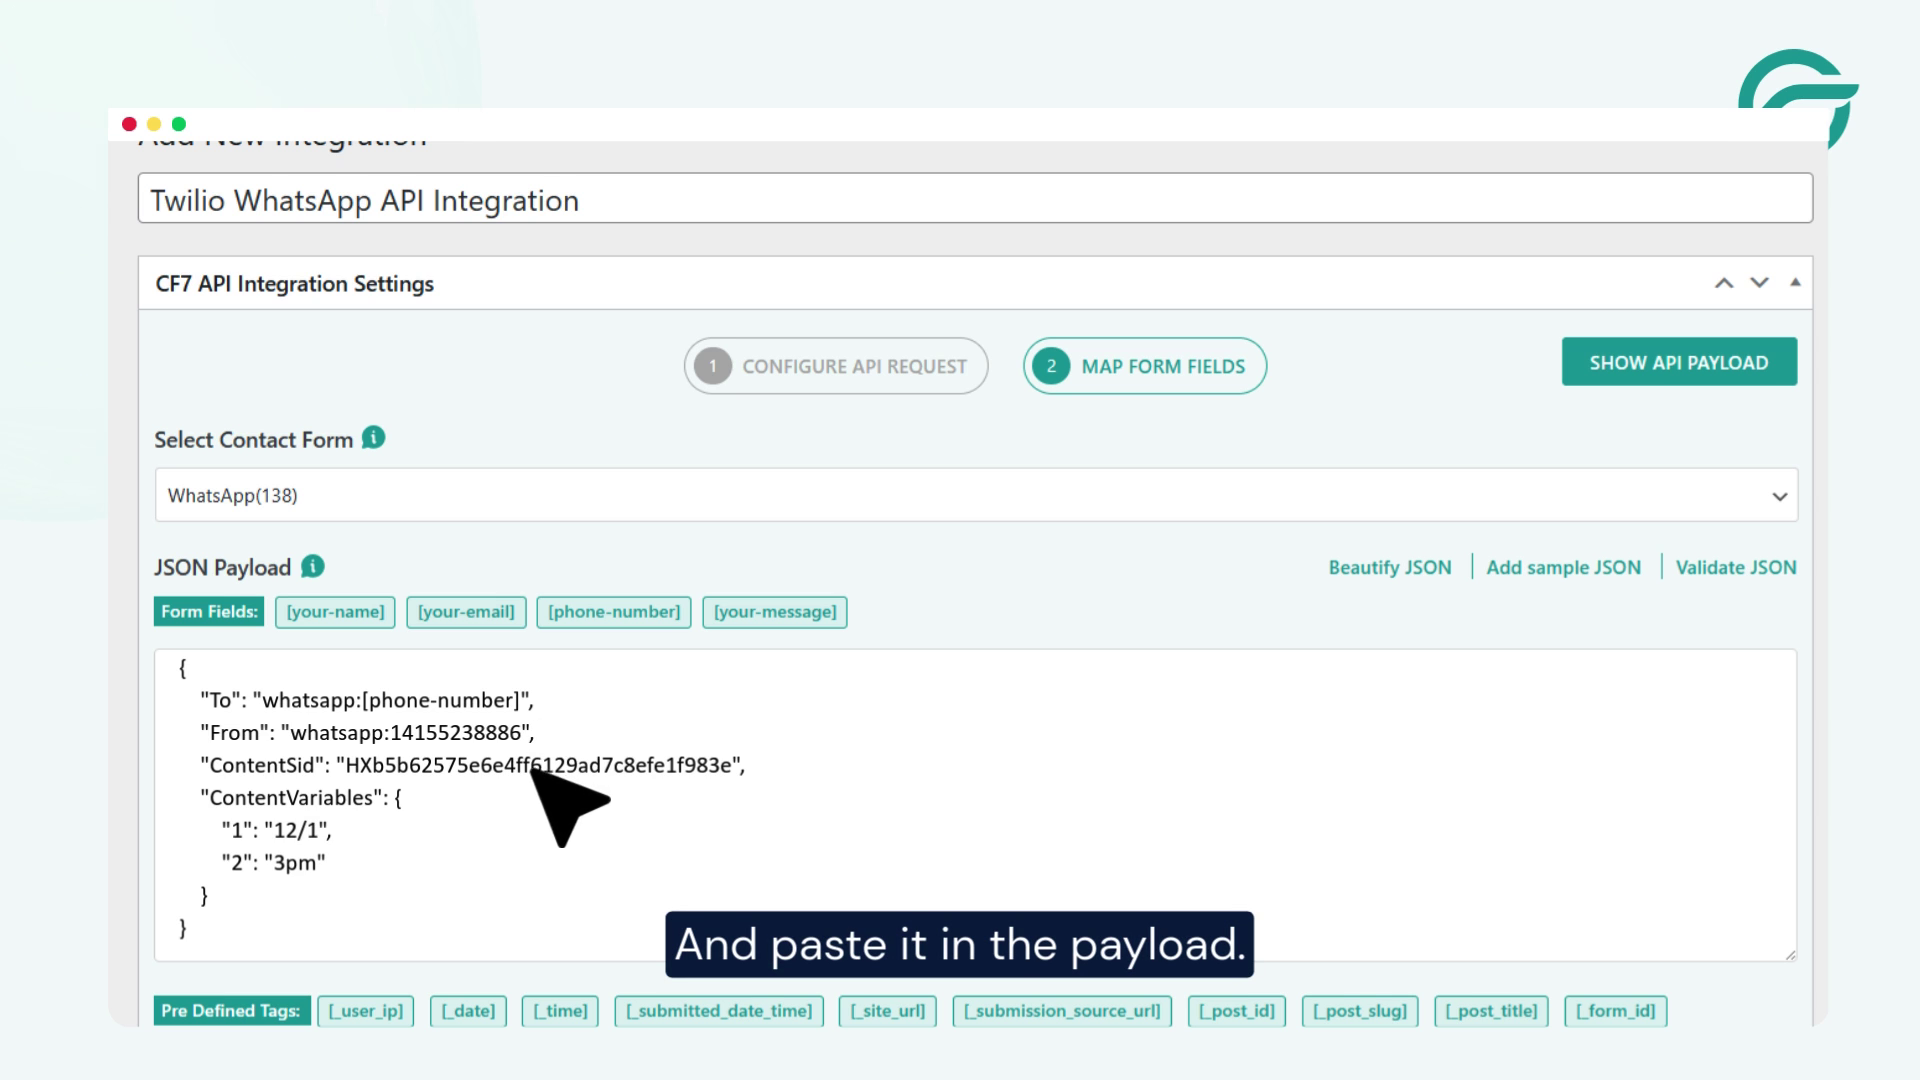
Step 10: Configure the JSON Payload
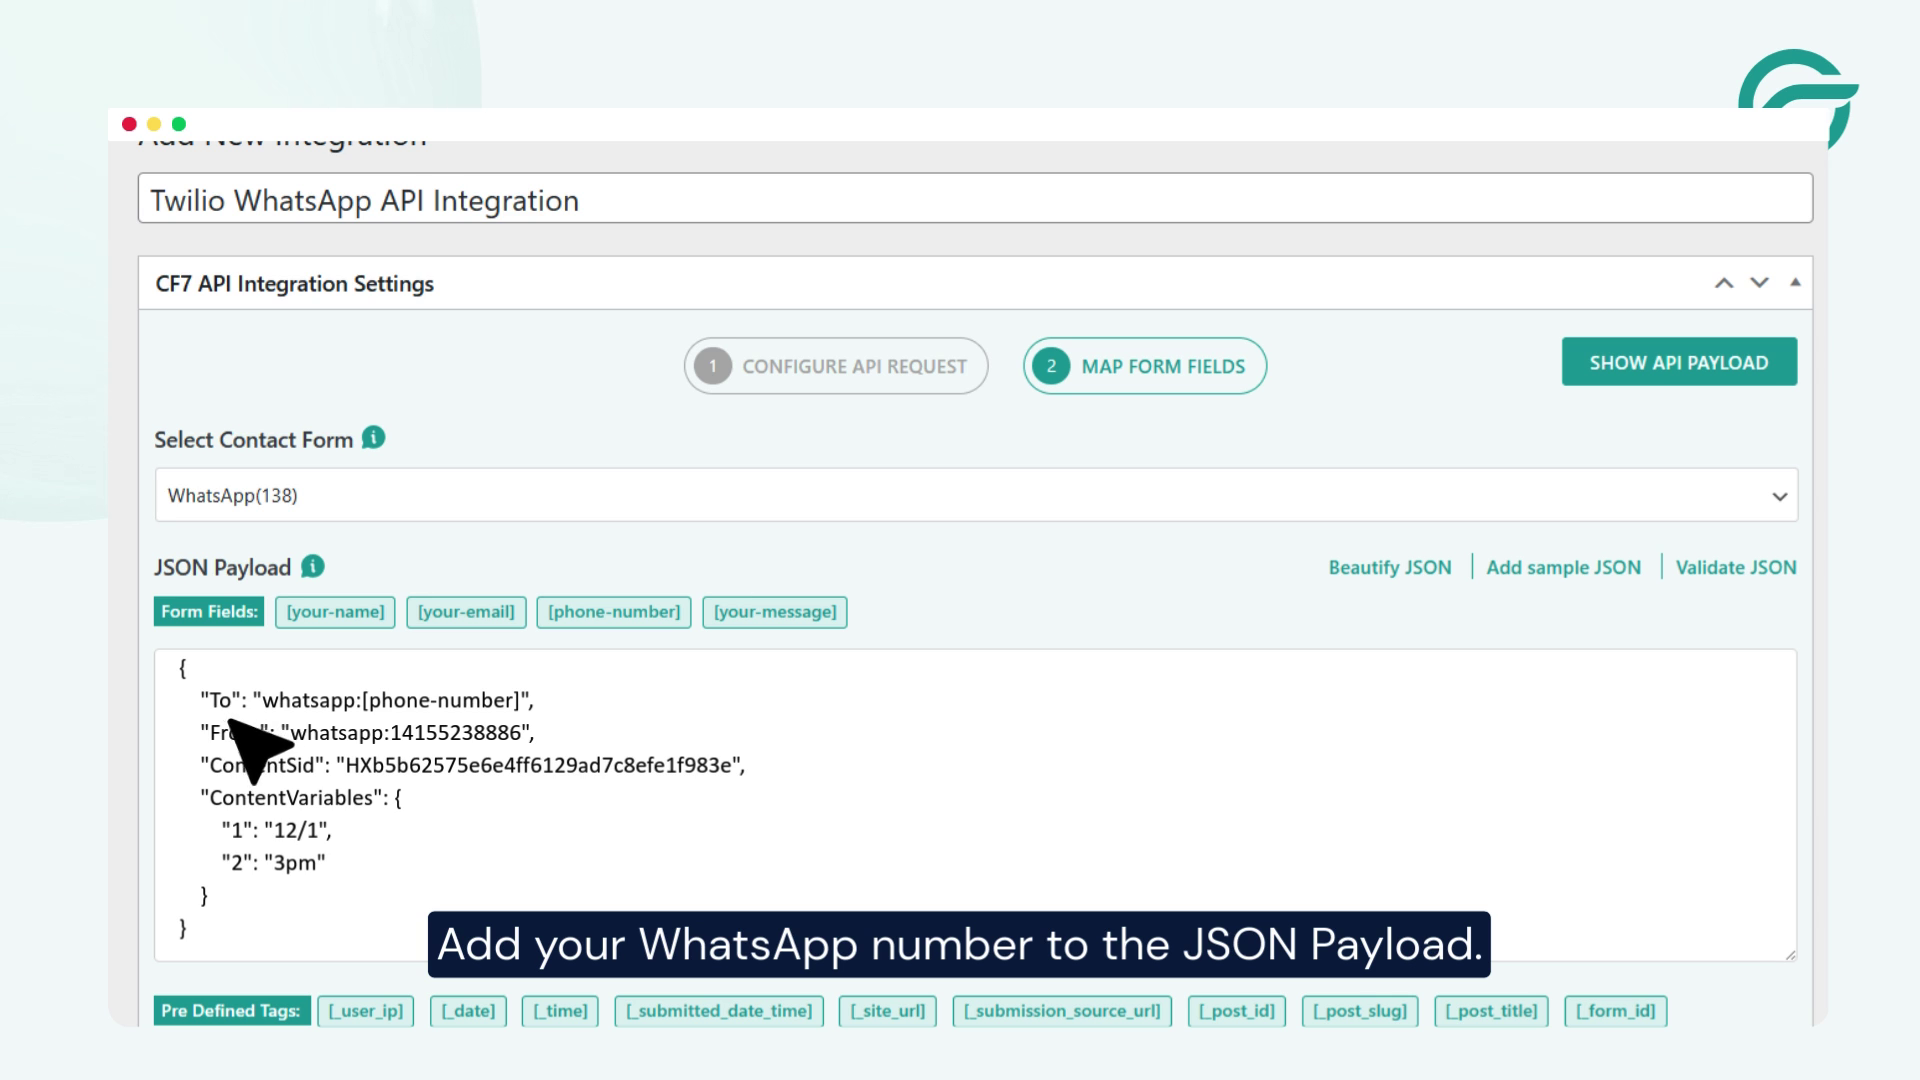
Add the destination WhatsApp number to the JSON payload.
Ensure the payload structure matches Twilio’s Messages API requirements.
Step 11: Add the ContentSid (Template ID)
WhatsApp messages sent via Twilio must use approved message templates.
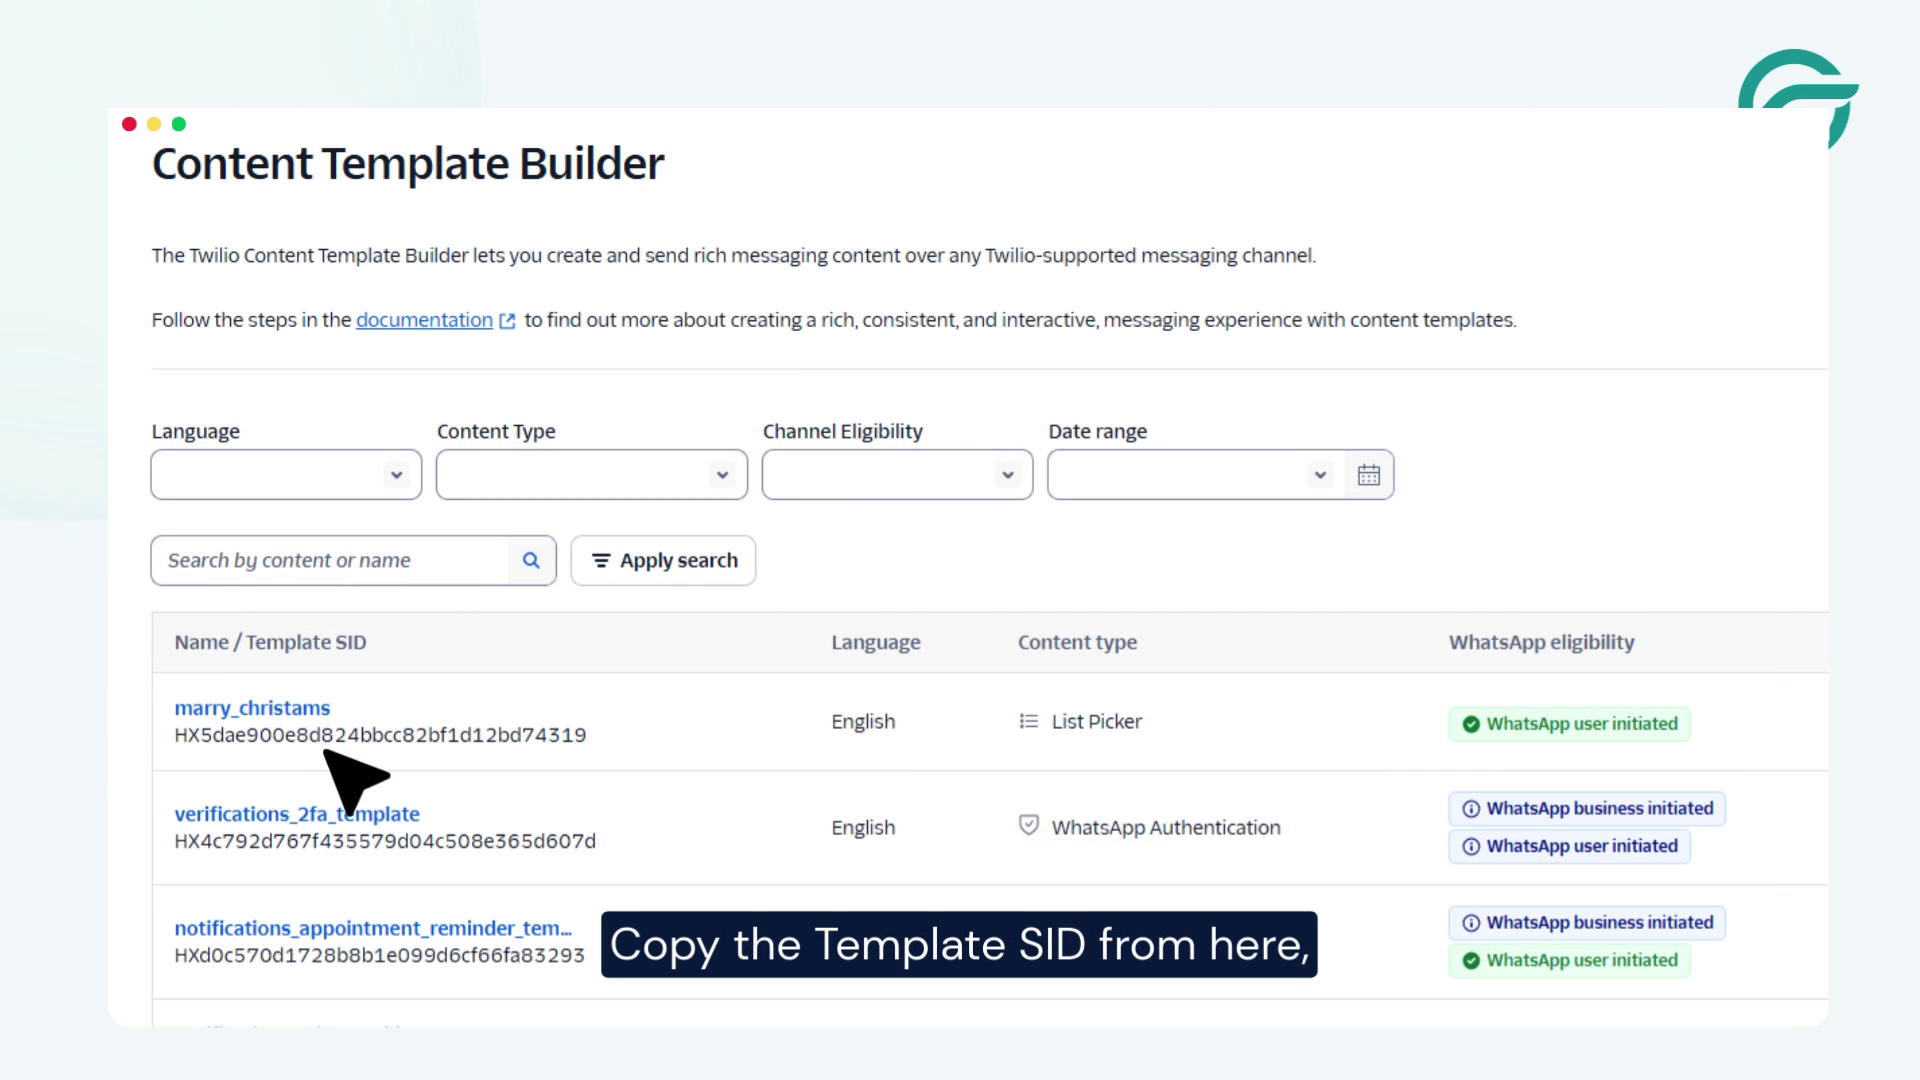
- Go to the Twilio Dashboard.
- Open Content Template Builder.
- Create a new template.
- Copy the Template SID (ContentSid).
- Paste it into the JSON payload.
Free-form outbound WhatsApp messages are not supported for business messaging.
Step 12: Schedule and Save
Set the date and time for sending messages.
Save the connection.
Step 13: Verify in API Logs
Once the form is submitted, navigate to:
CF7 to Any API → Logs
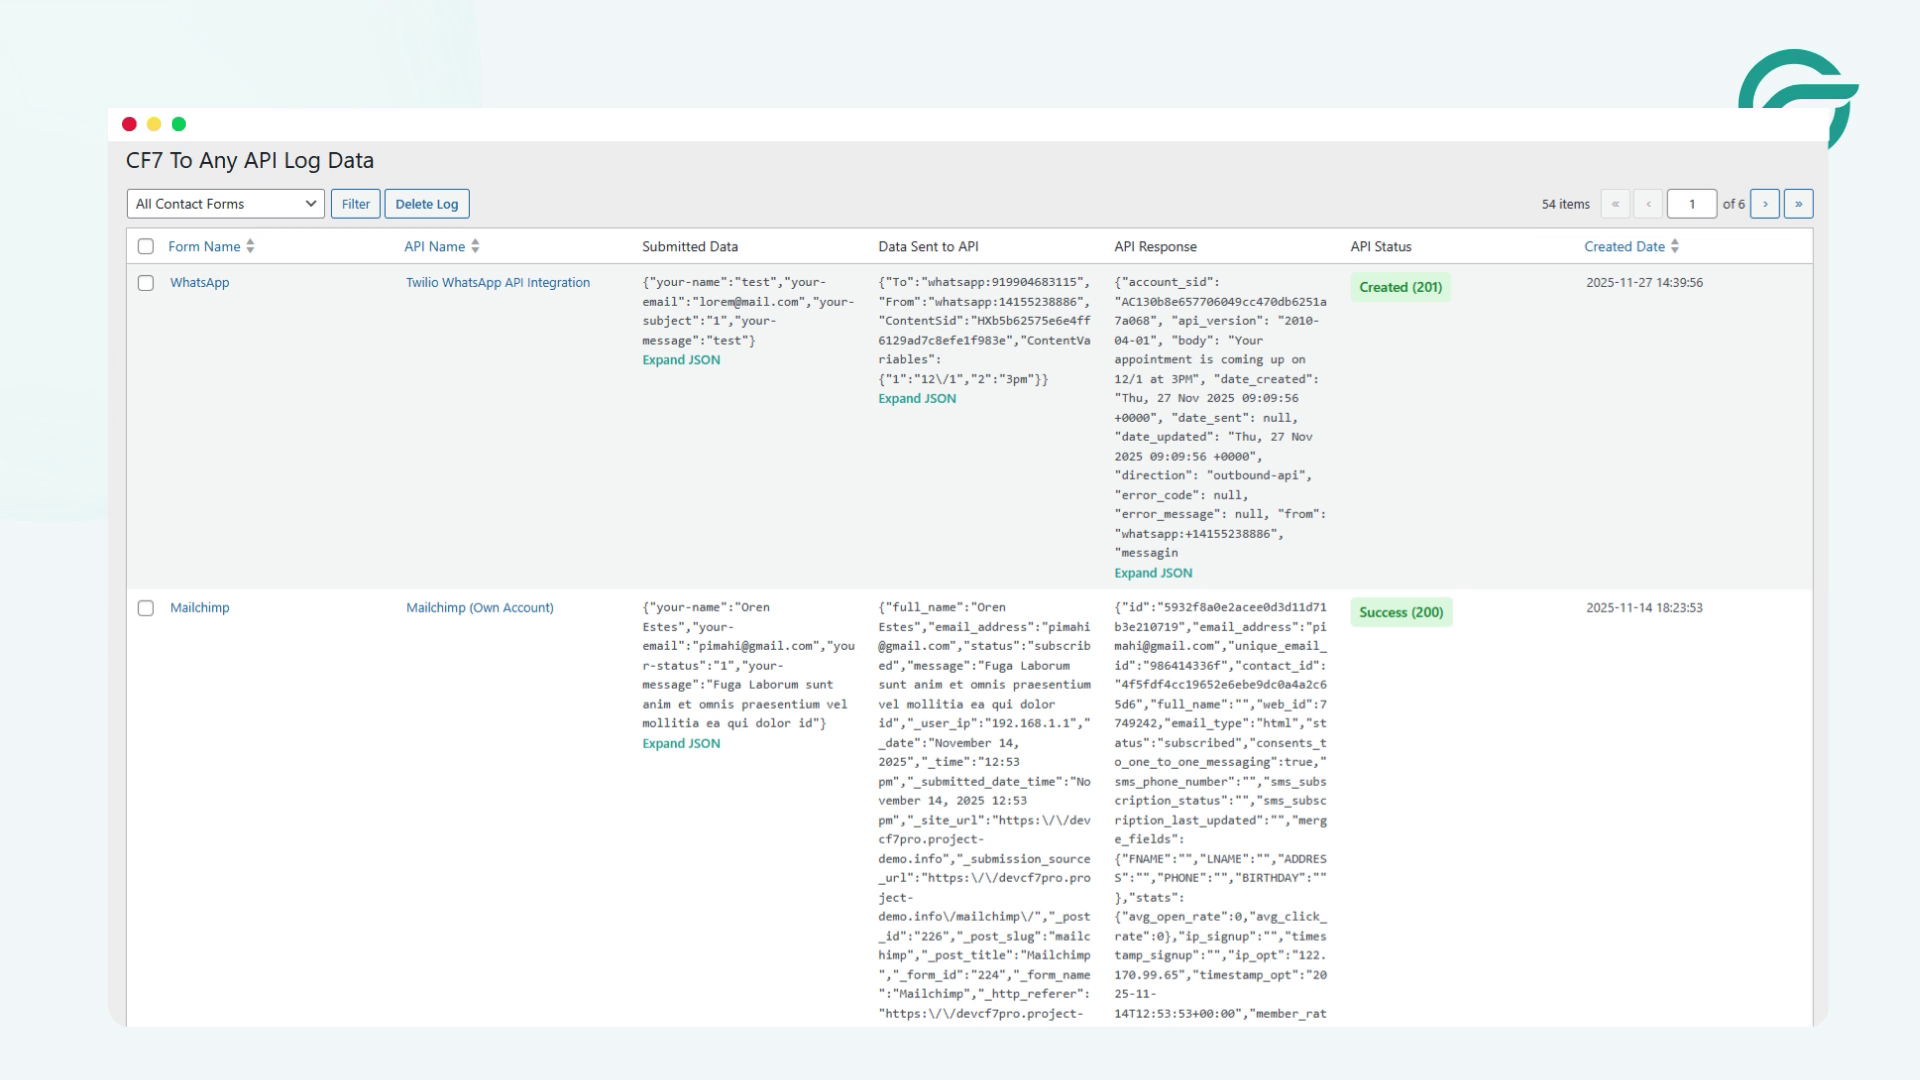
You should see:
- Full request payload
- Request headers
- API endpoint URL
- Twilio’s response (success or failure)
This confirms the integration is working correctly.
Why does an API-first WhatsApp integration scale better than plugin shortcuts?
This setup is ideal for developers needing deterministic, observable behavior in production systems and also want to stay aligned with the Twilio WhatsApp Business API official implementation model.
- Explicit control over authentication headers
- Fully structured JSON payloads
- Complete request and response logging
- No dependency on unofficial WhatsApp endpoints
- Compatible with internal APIs, proxies, and audit workflows
There is no middleware layer making assumptions on your behalf.
Smart Summary
A Contact Form 7 submission triggers an event. Contact Form 7 to Any API converts it into an authenticated HTTP request. Twilio processes the request and returns a response.
Logs capture both success and failure.
Nothing is hidden. Everything is visible.
Availability
This integration is supported only via Contact Form 7 to Any API PRO.
It is required when:
- CF7 data passes through internal or proxy APIs
- Structured payloads must be stored or routed server-side
- Auditing, compliance, or validation workflows are involved
Business Use Cases for a CF7 WhatsApp Integration Plugin
1. Instant Lead Notifications
When a prospect submits a contact or quote form, the plugin sends CF7 data to WhatsApp immediately, notifying your sales team on their phones. Fast response times directly influence conversion rates, and WhatsApp alerts keep reps informed without requiring them to monitor email or a CRM dashboard.
2. Customer Confirmation Messages
A CF7 WhatsApp integration plugin can automatically send confirmation messages to customers after a form submission is completed. This is useful for contact requests, demo inquiries, appointment forms, and support submissions where immediate acknowledgment improves communication.
3. Support and Service Requests
Support forms submitted through your site trigger instant WhatsApp alerts to the right team member. This removes the lag of email-based workflows and allows support staff to prioritize urgent cases as soon as they come in.
4. Appointment and Booking Forms
Websites that collect booking or appointment requests through Contact Form 7 can use WhatsApp notifications to receive submission details in real time. This helps businesses track bookings faster and reduce missed follow-ups, which ultimately reduces back-and-forth and lets teams confirm availability faster.
5. Internal Team Alerts
Companies managing multiple departments or operational workflows can use a CF7 WhatsApp integration plugin to send form submission alerts to specific team members on WhatsApp. This makes it easier to route inquiries, service requests, or internal notifications without relying only on email communication.
6. E-commerce Product Inquiries
When a customer submits a product inquiry or custom order form, the plugin sends CF7 data to WhatsApp automatically, letting your team respond while the customer’s interest is still active.
7. Marketing Campaign Lead Tracking
Landing page forms tied to paid campaigns can trigger WhatsApp alerts for each new lead. Marketing and sales teams get real-time visibility into campaign-generated submissions without waiting for daily email reports.
Make Your Forms Work As Efficiently As Your Business
Integrating Contact Form 7 with WhatsApp helps businesses turn form submissions into faster and more actionable conversations. Instead of relying only on email notifications, businesses can send CF7 data to WhatsApp automatically and receive form submission details directly through WhatsApp for quicker responses, better lead handling, and improved customer communication.
Using Twilio with the Contact Form to API plugin provides a practical way to forward Contact Form 7 submissions to WhatsApp without building a custom integration or depending on external automation tools. Whether the goal is to receive instant admin alerts, send customer notifications, manage appointment requests, or streamline support workflows, this setup allows WordPress websites to automate WhatsApp messaging directly from Contact Form 7 submissions.
Once configured, the integration works with your existing Contact Form 7 forms and helps create a more responsive communication workflow by connecting WordPress form activity with real-time WhatsApp messaging.
Frequently asked questions about Contact Form 7 and Twilio WhatsApp
1. Is there a CF7 WhatsApp integration plugin?
Yes. Contact Form 7 to API is a WordPress plugin that connects CF7 directly to Twilio’s WhatsApp Messaging API. You configure the API endpoint, authentication, and JSON payload through a no-code interface inside WordPress.
2. Can I send CF7 form submissions to WhatsApp without Zapier?
Yes. This plugin send CF7 data to WhatsApp directly via Twilio’s API, with no third-party automation tools required. The request is made server-side from your WordPress site, keeping your data in your own stack.
3. Does this integration work for both admin alerts and customer notifications?
Yes, you can configure the integration to send WhatsApp notifications to admins, support teams, sales teams, or customers based on your workflow requirements. This makes it possible to forward Contact Form 7 submissions to WhatsApp for both internal alerts and customer communication.
4. What do I need from Twilio before setting up this integration?
Before setting up the integration, you need a Twilio account with WhatsApp messaging enabled along with your API credentials. These details are used by the Contact Form to Any API plugin to connect Contact Form 7 with WhatsApp messaging workflows.
5. Can I send Contact Form 7 submissions to multiple WhatsApp numbers?
Yes, the integration can be configured to send Contact Form 7 notifications to different WhatsApp numbers depending on your workflow. This is useful for routing inquiries to sales teams, support departments, or multiple team members.
6. Can I use this setup to send automated customer replies on WhatsApp?
Yes, businesses can use this integration to send automated WhatsApp messages after users submit a Contact Form 7 form. This is commonly used for confirmation messages, inquiry acknowledgments, appointment requests, and customer follow-ups.
7. Why use WhatsApp notifications instead of email notifications for Contact Form 7?
WhatsApp notifications are typically seen faster than email notifications, which helps businesses respond to inquiries more quickly. Sending CF7 data to WhatsApp automatically also helps teams manage leads and customer communication in a more active messaging environment.


